Offline Quiz in the TeachCenter (Exam)
General information on the Offline Quiz activity in the TeachCenter (Exam)
Types of exams for which you can use the Offline Quiz in the TeachCenter (Exam)
The Offline Quiz activity can be used to conduct and subsequently grade in-person exams.
If an official exam date is scheduled in TUGRAZonline and if the group of people registered for the exam are not the same students who are currently attending the course, please use the TeachCenter Exam (external site) .
If there is no exam date scheduled in TUGRAZonline, or the quiz is used as a formative assessment (e.g. in a course with an immanent exam character, mock exam), use the TeachCenter (external site) .
In contrast to the regular quiz activity in the TeachCenter (Exam), only the following question types are possible:
- Multiple choice/single choice
- All-or-nothing multiple choice
How to create an Offline Quiz
Adding an Offline Quiz Activity
- Activate the editing mode using the slider at the top right.
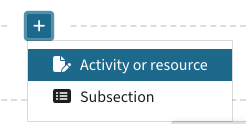
- Click on the plus icon wherever you want to add the activity, then Activity or resource.
- Select Offline Quiz.
- Enter a title for the Offline Quiz. This name will also appear on the printed exam papers.
- If you want the date and time of the exam to appear on the exam paper, enable the Date of Offline Quiz.
Important: These settings do not determine students‘ access to the activity. If you do not want students to see the activity in the TeachCenter (Exam), e.g. if you do not want to grant access to the students‘ attempts, you must hide the activity. If you want students to see their quiz attempts after the exam, you have to display the activity for students and configure the exam access settings accordingly. For more information, see the settings for „Students may view“ below.
- In Number of groups, choose how many exam groups you need(A/B/C/D/E/F). You can create different exam papers and add questions for each group.
Note: The number of groups does not refer to groups in your TeachCenter (Exam) course, but only to the number of different exam papers.
- Enable Shuffle questions if you want the questions in each group to be arranged randomly when creating the exam papers.
- Enable Shuffle within questions if you want the possible answers in each group to be arranged randomly. To do this, Shuffle questions must be enabled in the question settings.
- If you want to create attendance lists and record attendance for the exam (e.g. to check whether an answer form has been collected from each person), enable Record attendance > Yes. For more information, see the section Using attendance lists in Offline Quizzes.
- Show an offline quiz tutorial for students: If you enable this setting, students will see instructions on how to take the exam (e.g., how to mark their answers and enter their student ID number) when they open the Offline Quiz activity. This information serves as a guide before the exam. Alternatively, you can provide the tutorial as a link in the TeachCenter (Exam) course; the link appears after saving the activity with this setting.
- In the Grade section, you can set a grade to pass (this only affects how the results are displayed). You can set the maximum points for the Offline Quiz and the points for each question later in the question overview.
- You can also configure various Form settings. Choose a form font. These settings apply at least to the answer forms, correction forms and attendance lists; for question forms, they only apply to PDF formats.
- Enable Print study code field on question form if you want the study code (Studienkennzahl) to be included on the cover form of the question form in addition to the name and student number.
- In Additional information you can edit the text that appears on the first page of the question form. By default, there are instructions on how to tick the boxes.
- Set the font size and file format of the question form.
Note: The answer forms have a standard font size that cannot be changed and are always generated as PDF files.
- Enable Print question grades if you want the number of points available per question to be displayed on the feedback form.
- Under Print info about answers, you can configure whether the question type (single choice, multiple choice, all-or-nothing multiple choice) or the number of correct answers will be displayed on the question form.
If you want students to be able to see their exam results online after the exam, you can configure the settings for this in the Students may view section. For more information, go to „How to view results“.
- Enable Students may view and set when review opens and closes in order to grant students access to their exam attempts and results.
Important: If no date is activated, students can view their results at any time! If you do not wish to grant access to the exam, you must hide the activity from students.
- In Review includes you can configure which information students will see. By default, the review includes all options.
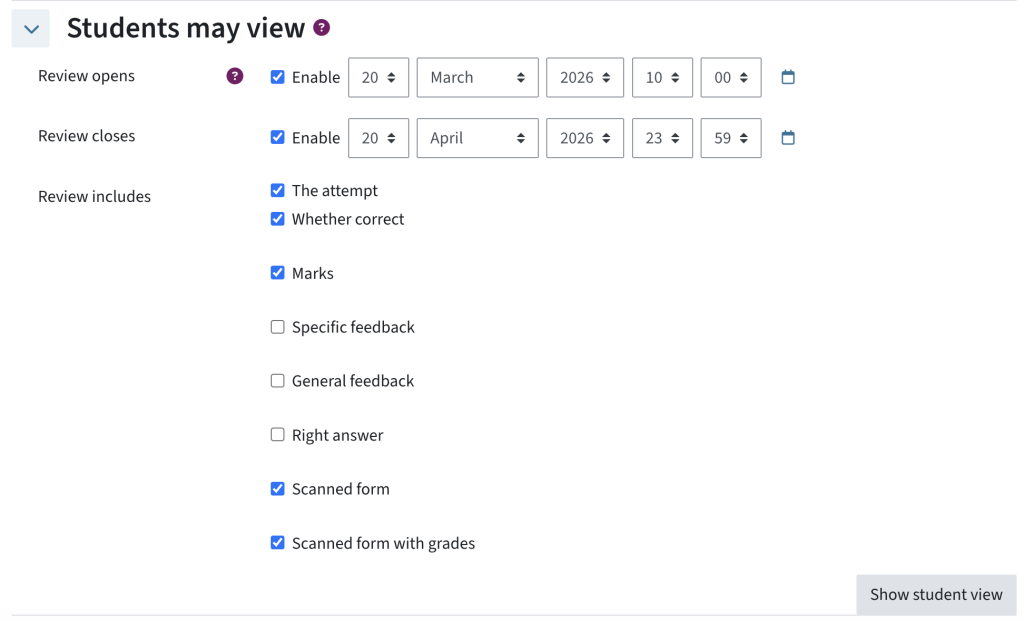
- The settings „the attempt“, „whether correct“, „marks“, „specific feedback“, „general feedback“, and „right answer“ refer to the quiz attempt, similar to the „quiz“ activity. The attempt: shows the questions, answers, and answers chosen by the students Whether correct: indicates whether the answer chosen is correct or incorrect; can only be activated in combination with „the attempt“ Marks: displays the points achieved and maximum points, or the points achieved per question, if the attempt is also displayed; can be shown independently of the other options Specific feedback: shows feedback for the answer chosen, if it has been added to the question earlier on General feedback: shows general feedback for a question if it has been added to the question earlier on Right answer: shows the correct answer
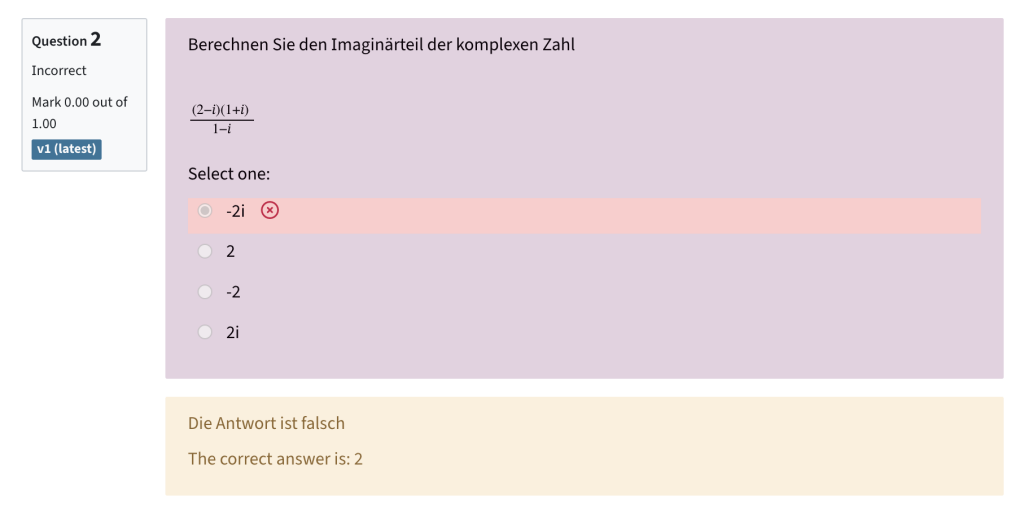
- If you want students to see the scanned forms, activate the option Scanner form (shows the scanned answer form with markings where boxes have been identified) or Scanner form with grades (shows what has been marked incorrectly and what would be correct, as well as the number of points achieved per question; question and answer texts are not displayed).
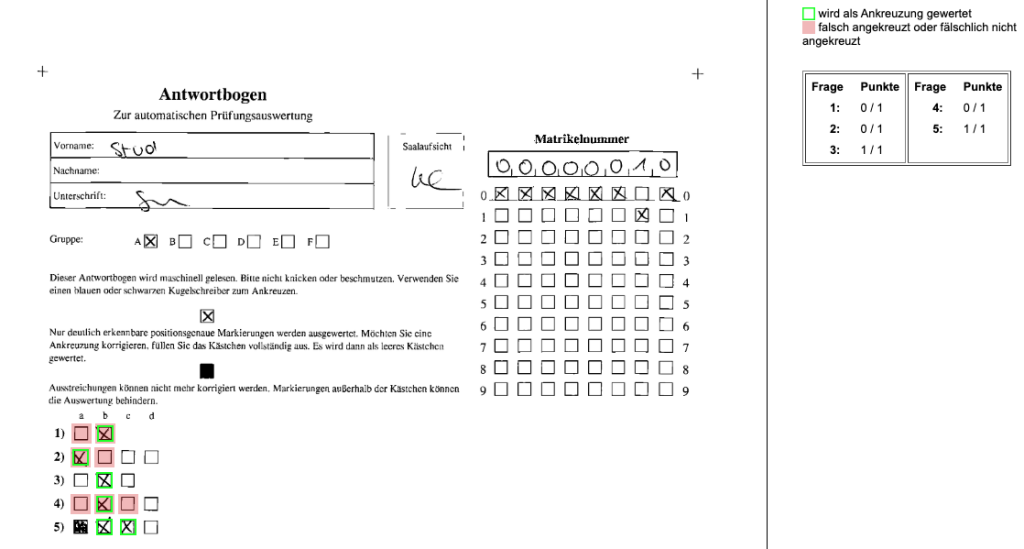
- By clicking the Show student view button, you can see a preview of how the exam review would look for students with the current settings.
- Finally, click Save and display.
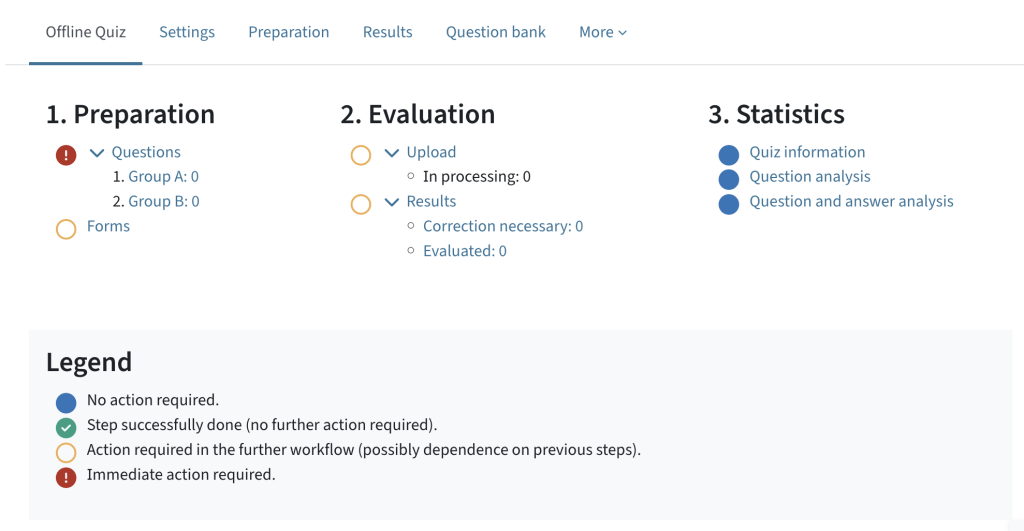
You will be taken to an overview that guides you through the various steps of the offline quiz and shows you which actions are required or have already been successfully completed. In each step (1. Preparation, 2. Evaluation, etc.), you can navigate directly to the respective actions, such as questions or forms. Alternatively, you can access them via the tabs in the menu and, if necessary, select the task from the drop-down menu at the top left.
Adding questions to the Offline Quiz
- To access the question management section, click Questions in the overview in Step 1. Preparation, or click the Preparation tab.
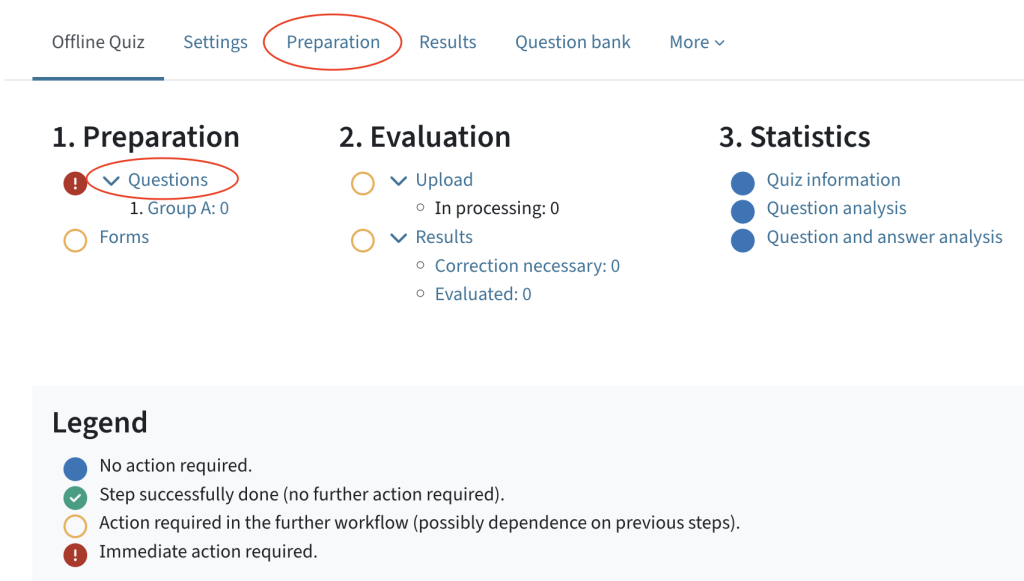
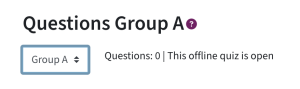
- If there are several exam groups, you can use the drop-down menu to select the group for which you want to add or edit questions.
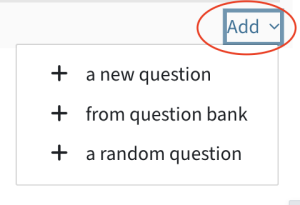
- By clicking Add, you can either create a new question or add existing questions from the question bank. You can find detailed instructions on how to create single-choice and multiple-choice questions and how to add questions from the question bank in the quiz activity guide.
Important: Please note that only the question types Multiple Choice/Single Choice and All-or-Nothing Multiple Choice are supported.
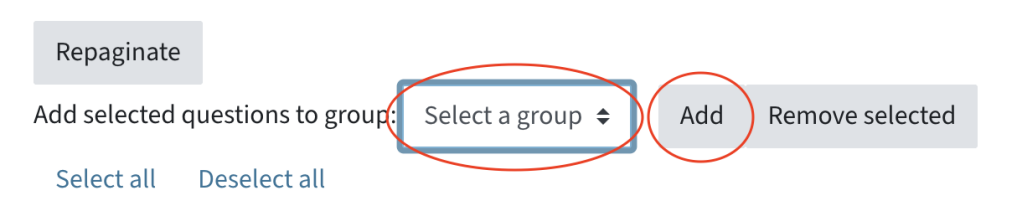
- If there are several exam groups, and you want to transfer questions from one exam group to another, you can select the relevant questions and choose the relevant group from the Add selected questions to group drop-down menu. Click Add to transfer the questions to the desired group.
- To change the order of the questions, you can move them around using the arrow icon in front of the question. If you have enabled Shuffle questions in the activity settings, the questions will be randomly arranged when the form is created, regardless of the order in the question overview.
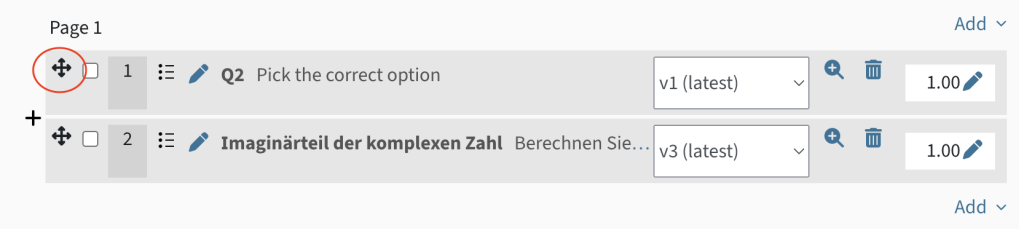
- To the right of each question, you can adjust the points for the individual questions. The sum is shown in the top right-hand corner as the Total of marks.
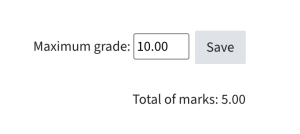
- Independently of this, you can set a Maximum grade (= actual maximum points for this quiz), which may differ from this and is the same for all groups. The sum of the points is scaled to correspond to this Maximum grade.
- Once you have added questions to the quiz, you will see a green checkmark in the Offline Quiz overview to indicate that the step has been completed successfully. By clicking on the group, you can also go directly to the respective questions.
Creating question forms
Once you are done configuring the quiz and adding the questions, you can create forms.
- In the overview, click Forms in step 1. Preparation, or click on the Preparation tab and then on Forms in the drop-down menu at the top left.
- You will now see a preview of the quiz questions.
- If the settings for shuffling questions or answers have been activated, these will already appear in random order. By clicking on Reload question list or Shuffle answers/Reload question list (depending on the activity settings), you can shuffle the questions/answers again.
- Once you are satisfied with the order, click Create forms.
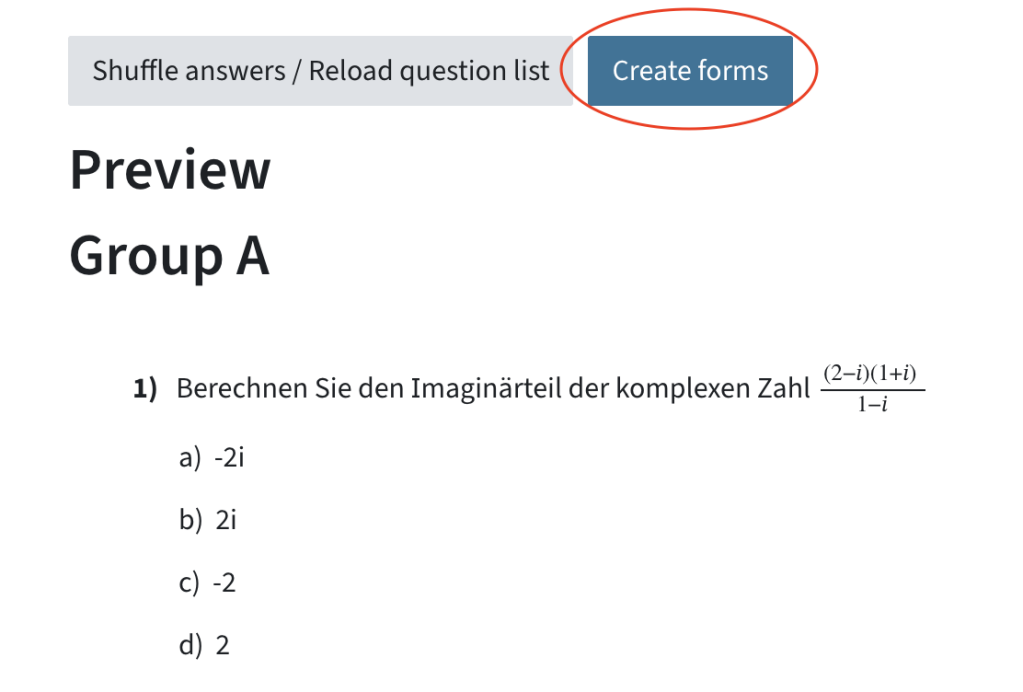
Please note: Once the forms have been created, no further changes can be made. To edit the forms again, you must first delete the forms.
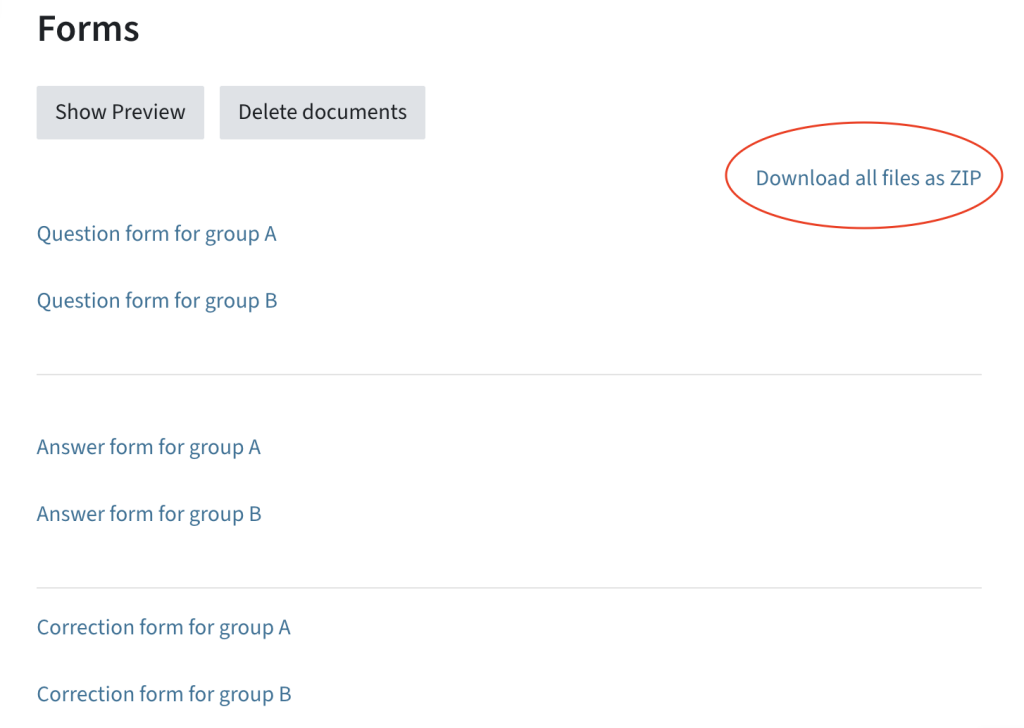
- You can now see all the forms for all exam groups and download the files either separately or as a ZIP file. Question form: contains boxes to fill in name, student ID number, study code (Studienkennzahl, if applicable), signature, optional description or help for filling in the answer form, and the list of questions Answer form (for automatic exam evaluation): contains student data (first name, surname, signature), information about the group, student ID number, and pre-printed boxes for marking the correct answers Correction form: contains the questions, correctly marked answers, and weights/percentage of the answers as a guide for examiners
How to conduct and grade an Offline Quiz
Conducting Offline Quizzes
For the exam, print out the question and answer forms for the students. We recommend printing out several answer forms in case students make mistakes when ticking the boxes (e.g. if boxes have been coloured completely by mistake and cannot be corrected).
Tips on how to conduct the quiz with your students:
- Use a blue or black ballpoint pen to mark your answers.
- The markings must be clear and precisely positioned with a cross. Only clearly recognisable, precisely positioned markings will be evaluated.
- To correct a marking, colour the box completely. It will then be counted as an unmarked box.
- Crossed-out or completely coloured boxes cannot be corrected.
- Markings outside the boxes may interfere with grading.
- Enter your matriculation number in the field provided on the answer form. Then transfer your matriculation number with crosses to the boxes below, which are numbered from 0 to 9. The first column corresponds to the first digit of your ID number, the second column corresponds to the second digit of your matriculation number, and so on.
Scanning exam forms
When scanning, ensure that the answer forms are not smudged or stapled together and the scans are not crooked. Otherwise, errors may occur during automatic grading.
Scan the completed answer forms with a resolution of 200 to 300 dpi and in black and white or greyscale. The following file types are accepted:
- JPEG or JPG (as individual images)
- PNG (as individual images)
- TIF or TIFF (as individual images or entire document)
- PDF (as entire document)
Note: Individual image files must then be compressed into a ZIP file, as only one file can be uploaded at a time.
Uploading exam forms
- In the overview, in step 2. Evaluation, click on Upload, or click on the Results tab and then on Upload in the drop-down menu at the top left.
- Drag a file into the field via Drag-and-Drop, or click Choose a file and upload a file.
- Click Evaluate.
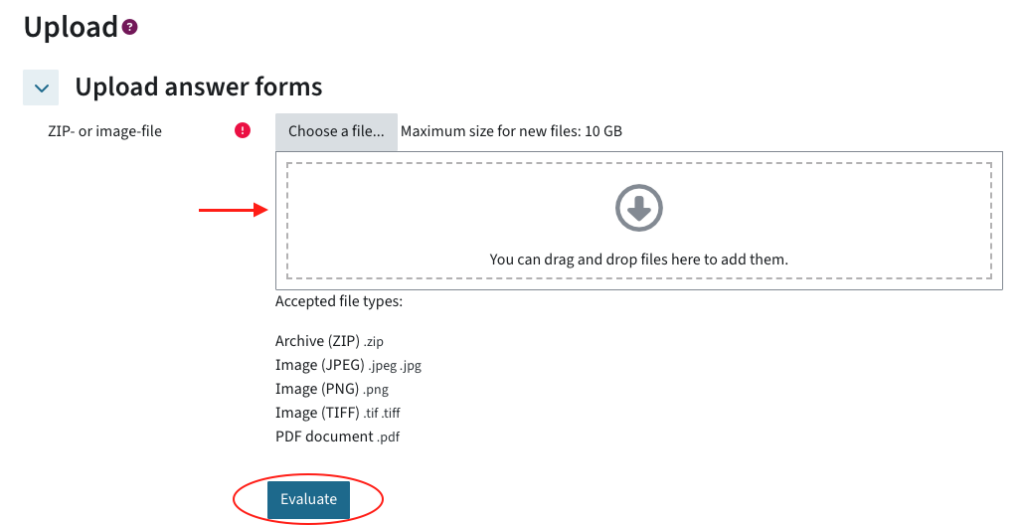
- The evaluation process will start immediately. An email will be sent to your address when the data has been processed.
Note: Ensure that students are enrolled in the TeachCenter (Exam) course. Otherwise, the graded exams cannot be correctly assigned to the students.
Correcting results
The exam questions are always graded automatically, depending on the grades (e.g. minus points) that have been set for the multiple-choice questions.
If errors occurred during evaluation and exam forms could not be graded, you will see a red icon with an exclamation mark in the overview in Step 2. Evaluation > Results. The number of faulty exam forms is displayed in Correction necessary. Click Correction necessary to access the respective forms. Click Correct to open the respective scan and correct it manually.
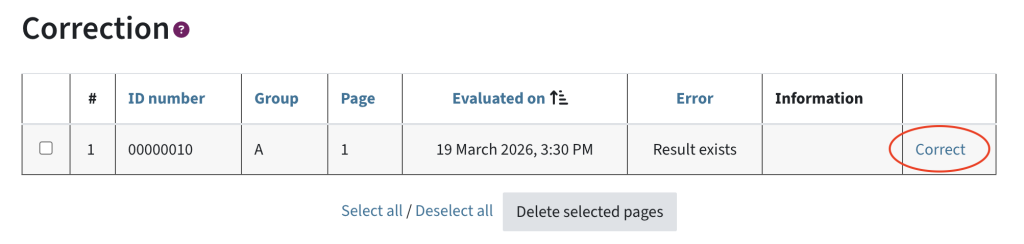
The following error messages might be displayed:
- User not in course: Ensure that the student is enrolled in the TeachCenter (Exam) course. Open the scan and check whether the matriculation number was correctly marked. Correctly marked boxes have green borders, while incorrect (or missing) boxes have blue borders. To correct the student’s matriculation number, click on the correct boxes. Then click Check group/student ID number on the right. Check whether the name entered for the student matches the name issued by the system at the top of the form. If everything is correct, you can save the corrected scan on the right.
- Inaccurate markings: This error message means that the system could not (clearly) recognise the markings. Open the scan and check for incorrect markings or deletions that are outlined in blue. To count an incorrect box as ticked, click on it until the box has green outline. To not consider an incorrect box as a tick, click on it until it no longer has an outline. Once there are no more incorrect or boxes with blue outlines, you can save the scan. Alternatively, you can click Save and show changes to students if you want the student so see their wrongly ticked boxes in the online exam review.
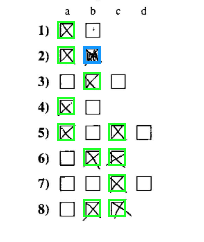
- Not aligned: This error can occur if the answer form has been scanned crookedly or is smudged in the area of the position markers or barcode. You can recognise the incorrect alignment by the fact that the plus symbols in the corners do not match the blue position markers. Often, many boxes are not evaluated (marked blue) or are misaligned. To realign the scan, drag the shifted position markers over the plus symbols and then right-click on Readjust. Repeat the process until the check marks have been correctly recognised, and the boxes have green outlines. If necessary, you can also rotate the scan. If aligned, click Save.
Viewing results as a teacher
To view the graded exam forms, click Evaluated in the overview in Step 2. Evaluation > Results, or click on the Evaluation tab and then choose Results in the drop-down menu at the top left. A table will appear with the student data, the date of the evaluation, the corresponding test group and the grade.
Below the table, you will find settings for the table display (e.g. the number of entries per page or whether only students with results should be displayed).
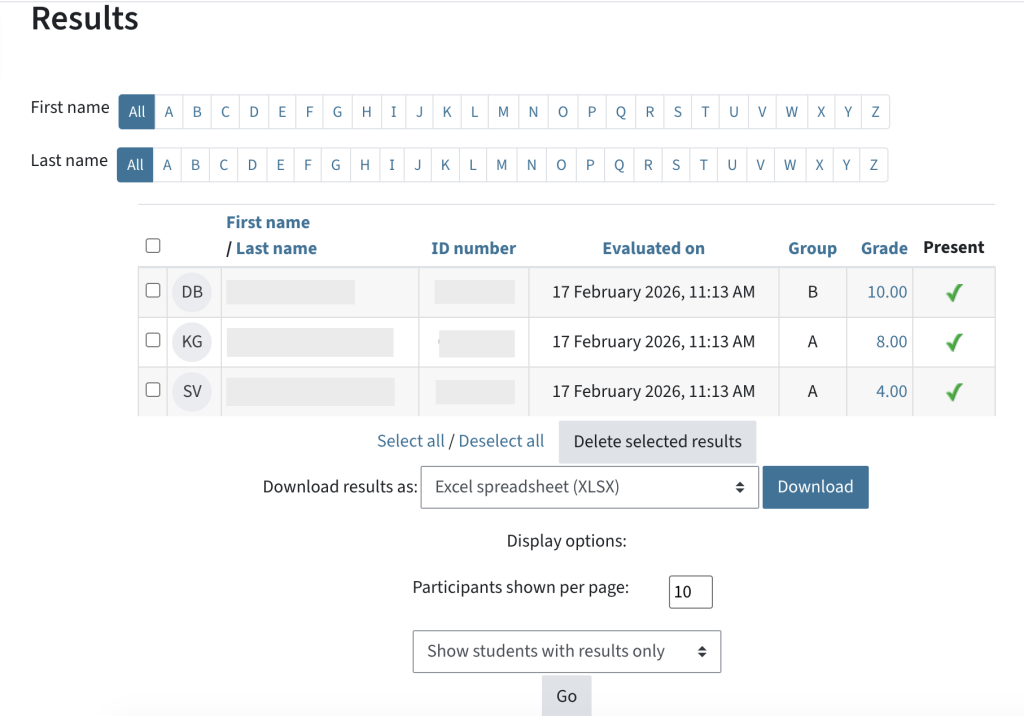
To view individual quiz attempts, click on the grade or score of the respective student. There you can also overwrite scores and add comments (e.g. for additional feedback or corrections).
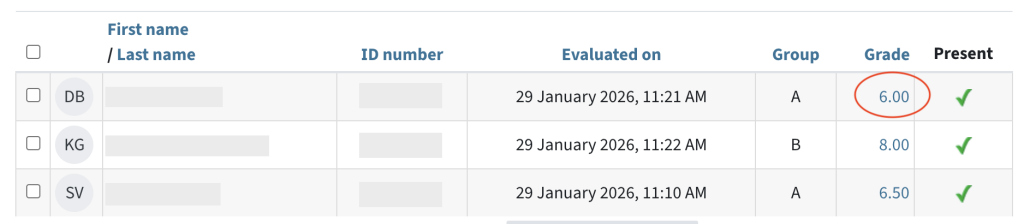
Click Make comment or overwrite mark to leave a comment and change the points. Save the changes.
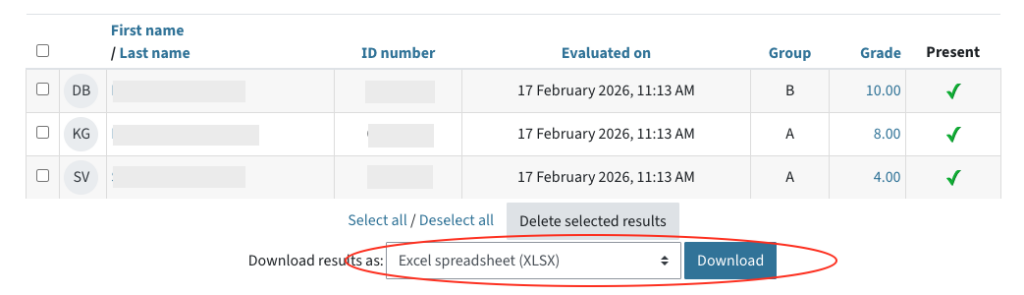
To download quiz results, select the respective students in the list or Select all. In the drop-down menu below, select Download results as and the desired file format and click Download.
How to use an attendance list for the Offline Quiz
Creating an attendance list
In the Offline Quiz activity, you can also create attendance lists for recording attendance, which you can print out, fill in, scan and evaluate in the TeachCenter (Exam). This allows you, for example, to check who was present at exams with large numbers of students and whether an answer form was collected and scanned from each person.
If you want to use attendance lists, you have to enable General > Record attendance in the activity settings.
A new tab called Attendance and also a section for attendance is now displayed below the overview of the Offline Quiz. There you can see which actions need to be taken (immediately) and which have already been successfully completed.
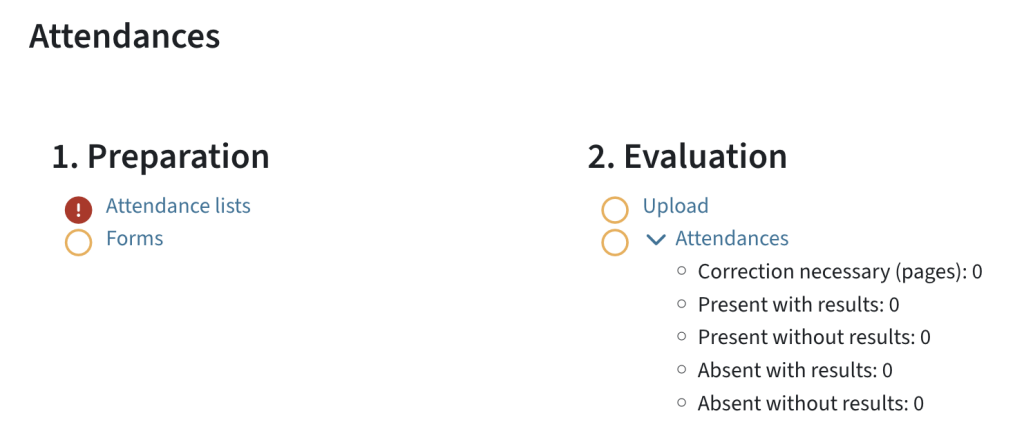
First, you have to create an attendance list:
- In the Attendances overview, in step 1. Preparation, click on Attendance lists (or in the Attendances tab).
- Enter a name for the attendance list in the input field in Add attendance list and click on Save. You can create multiple lists this way.
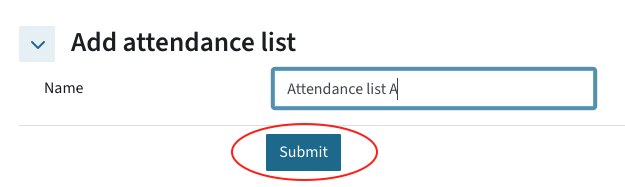
- All created lists are displayed in this overview. You can enter edit mode again by clicking on the pencil icon and delete them by clicking on the bin icon.
Adding students
In the next step, you have to add students to the attendance list.
Important: You can only add students who are enrolled in the TeachCenter (Exam) course.
- Click on the attendance list or, alternatively, click Participants in the drop-down menu at the top left and select the correct participant list on the left to which you want to add students.
- If necessary, select a TeachCenter group from the drop-down menu on the right from which you want to select students, e.g. if only some of the students are supposed to take the exam. By default, students from all groups are displayed.
- Select all the students you want to add to the list in the right-hand column (‚Potential members‘) and click Add.
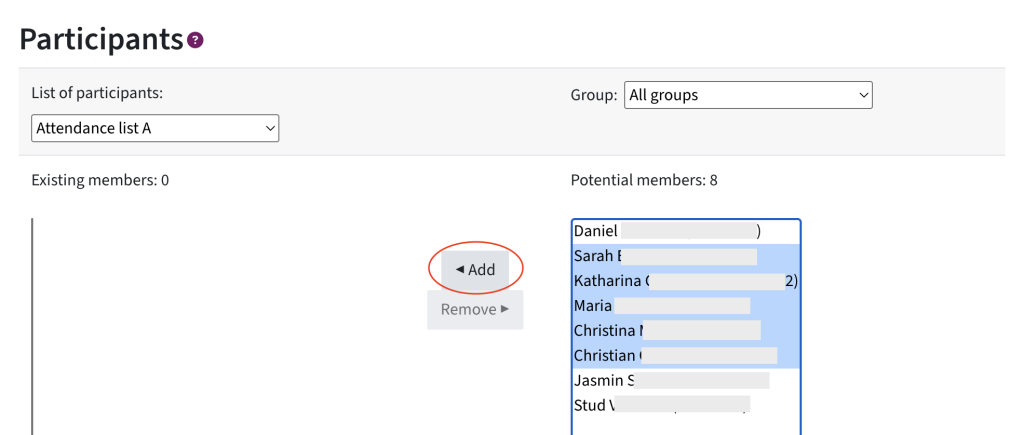
- If necessary, you can also remove students from the attendance list (left-hand column „Existing members“) in the same way.
Creating forms
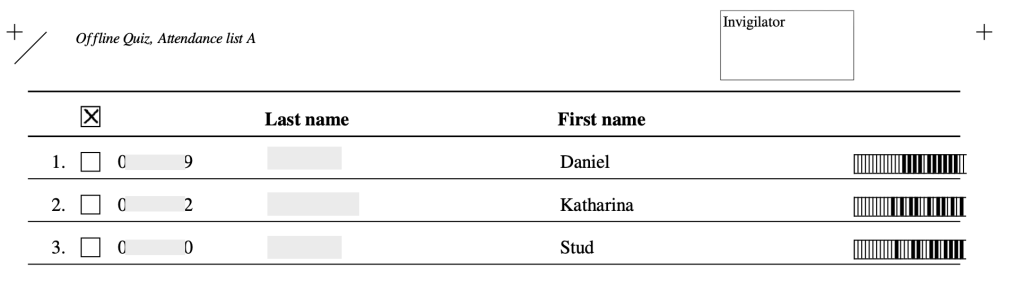
Use the drop-down menu in the top-left corner to select Forms and download the PDF document.
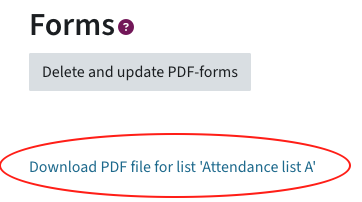
Note: A form is automatically generated as soon as students are added to the list. If you have subsequently edited the attendance list, you must delete and refresh the forms before downloading. Only then will the form reflect the current status.
Recording attendance and scanning attendance lists
Print out the attendance lists and record attendance during the exam by ticking all students present on the list.
Please note the following points:
- Please do not fold or smudge the answer form (especially around the barcode).
- Use a blue or black ballpoint pen to tick the boxes.
- The markings must be clear and precisely positioned with a cross. Only clearly recognisable, precisely positioned markings will be evaluated.
- If you want to correct a marking, colour the box completely. It will then be counted as an unmarked box.
- Crossed-out or coloured boxes cannot be corrected.
Then scan the completed attendance list at a resolution of 200 to 300 dpi and in black and white or greyscale. The following file types are accepted:
- ZIP
- JPEG or JPG (as individual images)
- PNG (as individual images)
- TIF or TIFF (as individual images or a single document)
Note: Individual image files must then be compressed into a ZIP file.
Uploading attendance lists
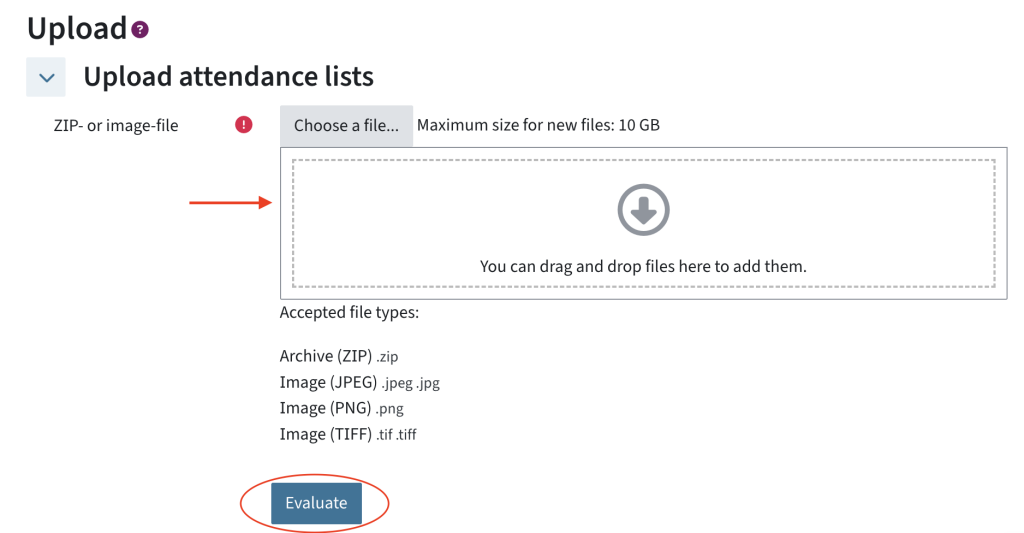
- In the Attendance section, in step 2. Evaluation, click Upload, or click on the Attendance tab and select Upload from the drop-down menu on the left.
- Drag and drop the file into the designated field, or click Choose a file and upload it.
- Click Evaluate.
Checking attendance
After evaluating the attendance list, you can check in the overview in 2. Evaluation > Attendance whether any corrections to the ticks are required, and how many students were present or absent, with or without a result.
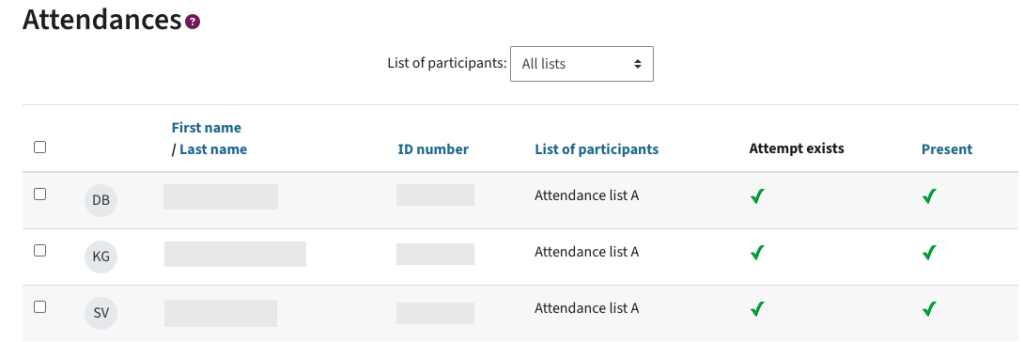
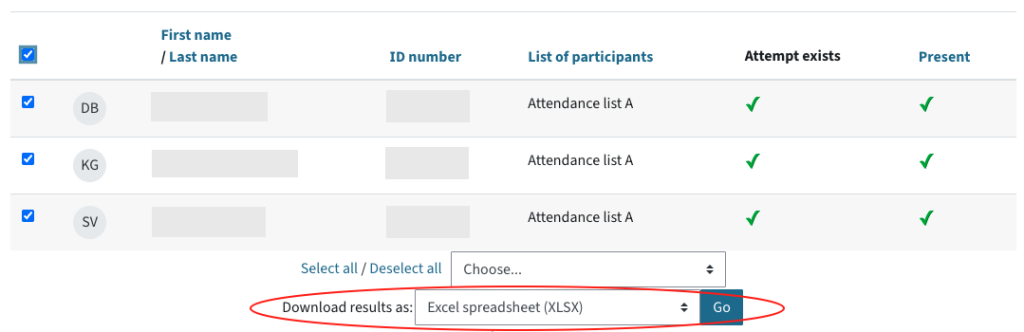
- Click on Attendance to view the attendance details. In this overview, you can see the information on students, which attendance list they belong to, whether a quiz result exists, and whether they were present. If there are several attendance lists, you can select which list to display from the drop-down menu at the top.
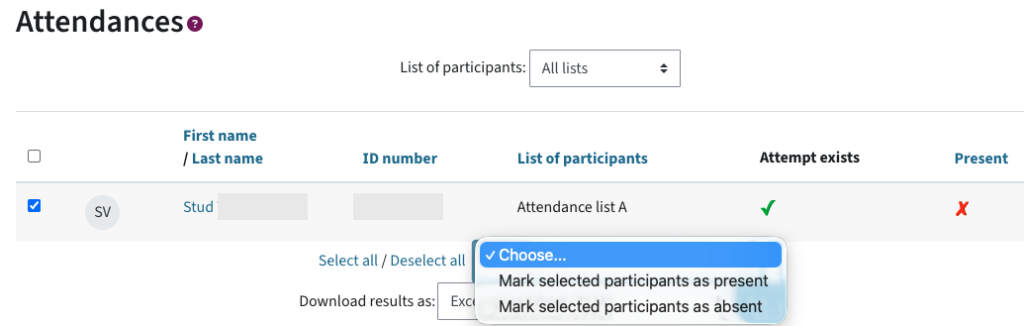
- To correct a recorded attendance, select the respective students in the table and use the drop-down menu below the table to choose whether they should be marked as present or absent.
- To correct a recorded attendance, select the respective students in the table and use the drop-down menu below the table to choose whether they should be marked as present or absent.
Help & contact
If something does not work as described, get in touch – we will look into it.