The quiz activity in TU Graz TeachCenter (Exam)
In this guide, you will find information on when to use a „quiz“ activity and how to create one.
General information about the „Quiz“ activity in the TeachCenter
For what kinds of exams can I use a TeachCenter quiz?
The Quiz activity is especially suited if your goals are:
- Checking factual knowledge
- Checking specific definitions
- Solutions to computational or mathematical tasks, where the result is more important than the process For complex mathematical tasks, the STACK plugin is available
By selecting an appropriate question type for a Quiz activity, more complex tasks are also possible, such as assessing the ability to use processes and procedures to solve a given problem. Consider that for these types of tasks, other activities such as the Assignment may also be suited.
Which question types are available?
All of the Moodle question types and a few additional ones are available. Here is a selection:
- Multiple choice and single choice
- True/False
- Matching texts
- Essay-type questions with short or long answers
- Numerical input
- Calculated questions with random variables, also as multiple choice
- Drag and drop onto text or image
- Gap-fill (Cloze) with free input or selection; can also be combined with regular expressions
- STACK (mathematical input with special syntax, computer-aided assessment)
- Coderunner (code input, checked against test cases)
- Coderunner (Eingabe von Code, Überprüfung von Testfällen)
Which question type is suitable depends on your task and learning goals. It is possible to combine several types in one quiz.
If you want to read more on further types of questions, we recommend the Moodle documentation. (external site)
Should I create the quiz in TeachCenter or TeachCenter Exam?
- If there is an official exam date in TUGRAZonline and the group of people registered for the exam are not the same students who are currently attending the course, use the TeachCenter Exam (external site) .
- If there is no exam date in TUGRAZonline, but the quiz is used as formative assessment (e.g. self-assessment, interim test in a course with continuous assessment, mock exam), use the ‚regular‘ TeachCenter. (external site)
Creating a test/quiz and questions
Adding a Quiz activity
- Activate the editing mode using the slider at the top right.
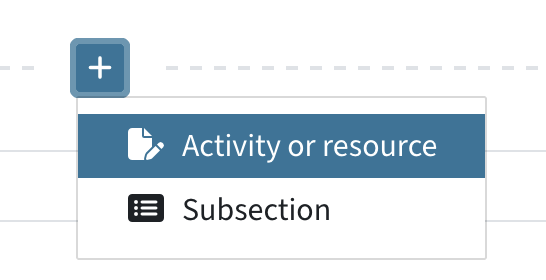
- Click on the plus icon wherever you want to add the activity, then Activity or resource.
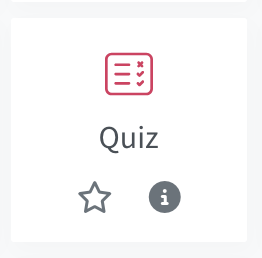
- Select Quiz.
- Enter a title for the quiz.
Now you can select the settings for your test:
- Open the quiz and close the quiz defines when the test is available to students. Students will see the activity before, but cannot open/start it.
- The Time limit defines how much time students have to complete the test. Example: Students have 1 hour in the span of 24 hours to take the quiz.
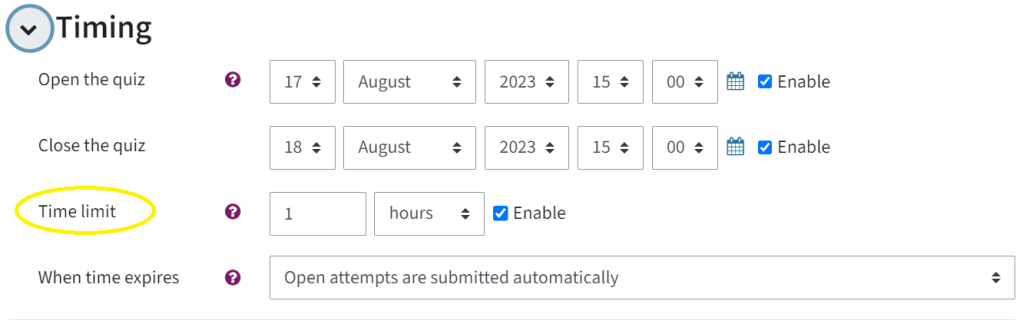
- When time expires, have open quiz attempts be submitted automatically so that no one forgets to submit.
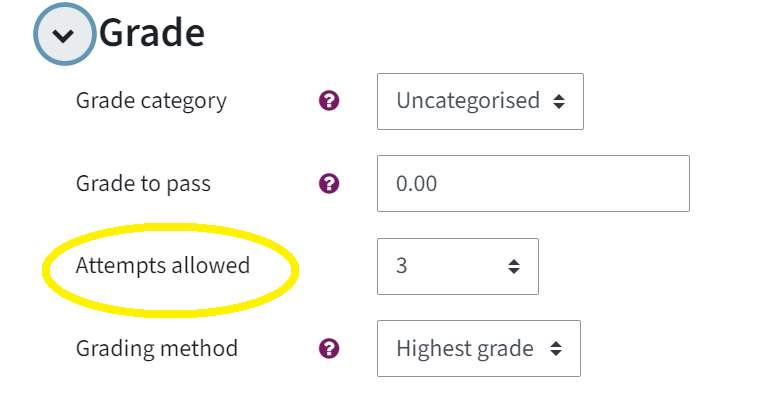
- In the Grade section, Grade to pass determines the minimum value required to pass (only relevant for how the results are displayed).
- In Review options, you can define what information is visible to students at which point. Immediately after the attempt applies to the time immediately after submitting. Later, while the quiz is still open settings apply until the quiz close date that has been set. After the quiz is closed settings apply after the quiz close date has passed. For an exam, it makes sense to uncheck all the boxes except „attempt“. However, after grading, check the „marks“ checkbox again that your students can see their own points.
- Im Bereich Überprüfungsoptionen können Sie definieren, was Ihre Studierenden wann sehen. Direkt nach dem Versuch beschreibt den Zeitpunkt, sobald die Studierenden den Test abgegeben haben. Später, wenn der Test noch geöffnet ist beschreibt den Zeitpunkt bis zum Zeitpunkt der eingestellten Testschließung. Wenn der Test abgeschlossen ist beschreibt den Zeitpunkt nach der Testschließung. Bei einer Prüfung macht es Sinn, alle Häkchen außer „Versuch“ zu entfernen. Schalten Sie nach der Bewertung jedoch das Häkchen bei „Punkte“ und „Maximalpunkte“ wieder ein, damit Ihre Studierenden ihre eigenen Punkte sehen können.
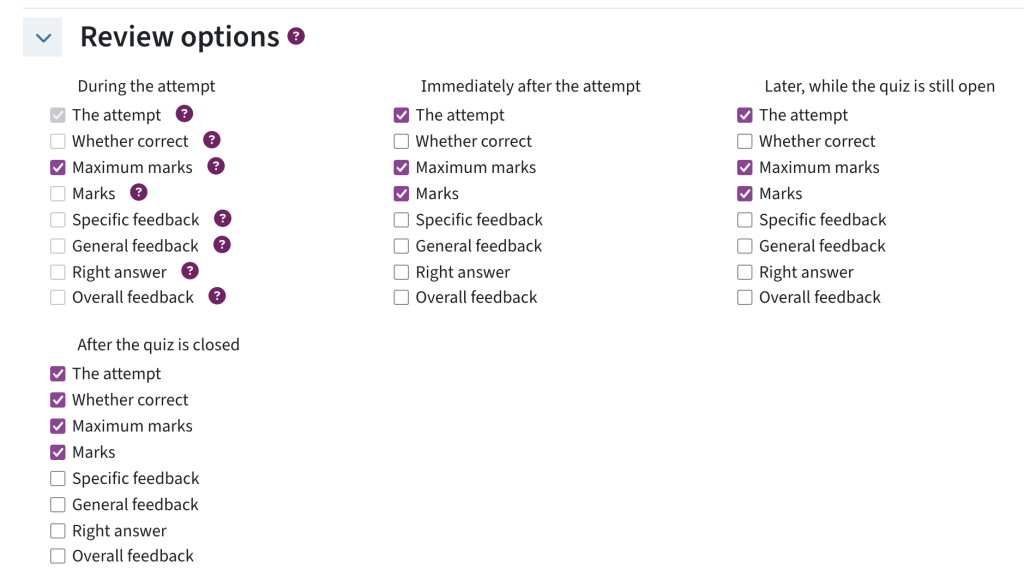
- Cilck Save and Display.
You have created an empty test. Now you need to add questions.
Creating questions, using single/multiple choice as an example
You can create questions directly in a quiz. However, it is easier for later management to create the questions in the course question bank and add them to the quiz in a next step. We will therefore show this way.
Create categories in the question bank (optional)
- Go to the course page, then More > Question bank at the top

- Select Categories from the dropdown.
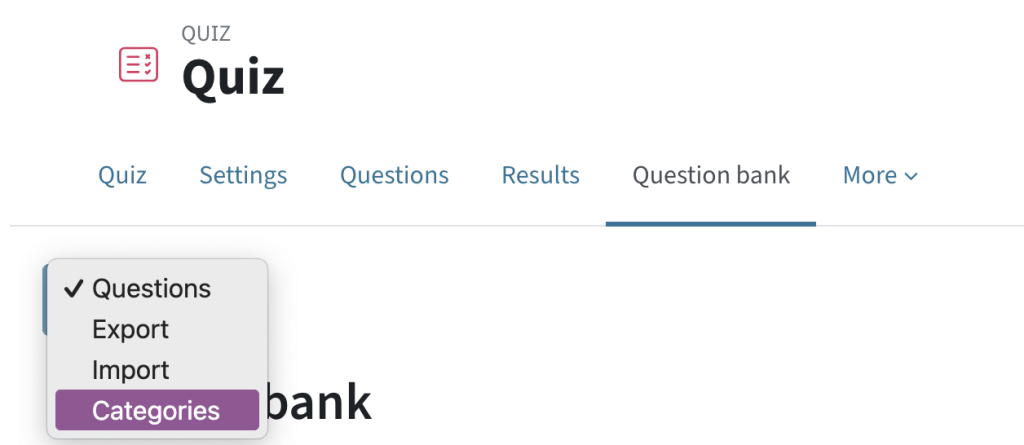
- Click Add a category. Choose a name for it. Please note: Make sure the category is created at the correct „level“ (e.g. at course level, not quiz level – this will ensure easier management later on).
- Return to Questions using the drop-down menu.
- Select the desired category in the filter and click on Create a new question below the filter.
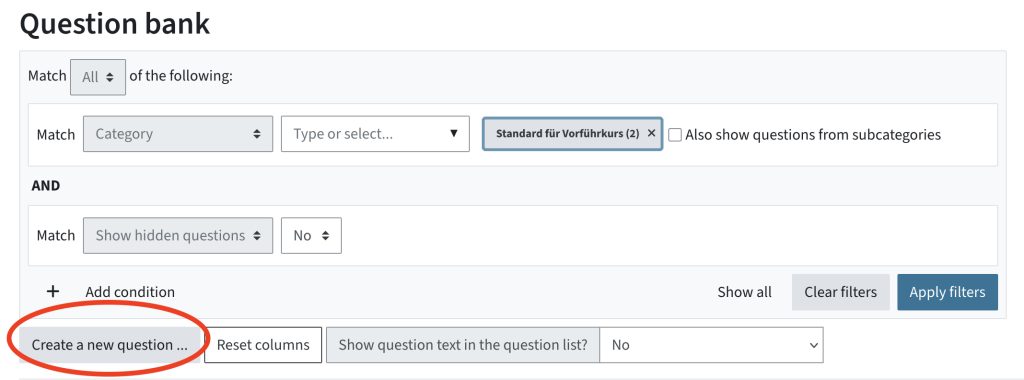
- Select Multiple Choice and Add.
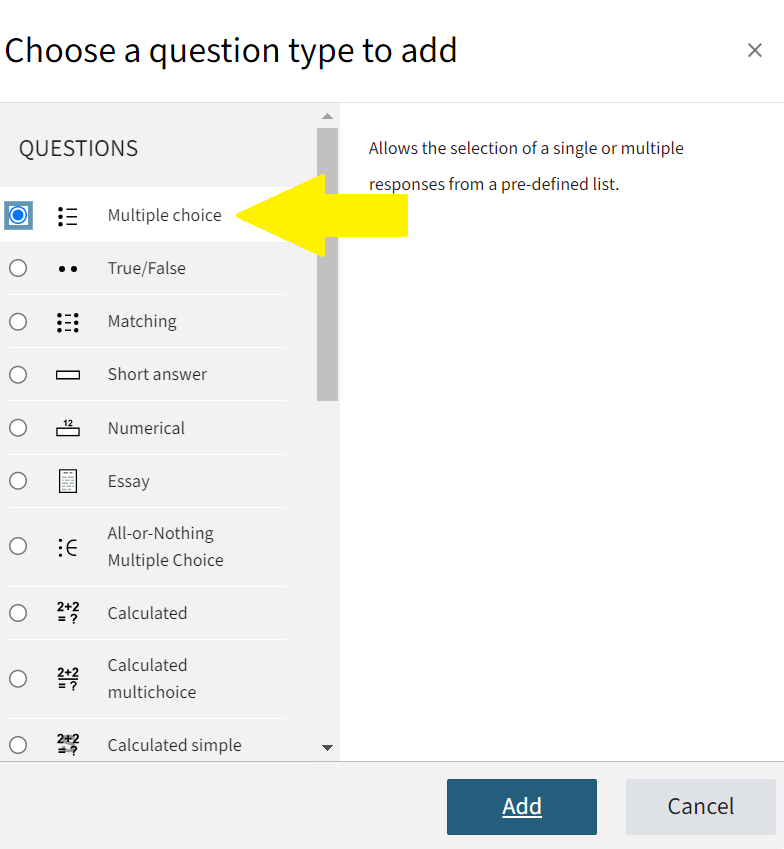
Settings of a single or multiple choice question
- Question name: choose a meaningful title for the question (only visible to teachers)
- Question text: Write the question that students will see.
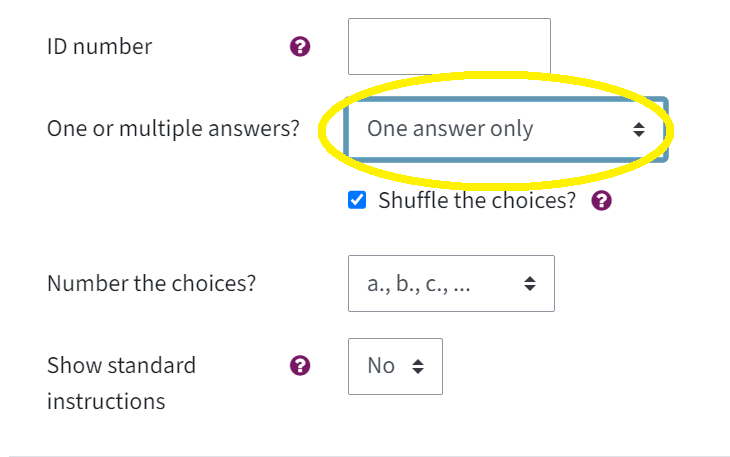
- One or multiple answers? For single-choice questions, select one answer only For multiple-choice question, select multiple answers
- In the Answers section, write the possible answers in Choice. You do not have to fill in all the options. If there are further possible answers, click on Blanks for 3 more choices.
- Grade: The grading is different for single and multiple choice questions. For single-choice questions, select 100% for the correct answer and None for the wrong answer(s). For multiple-choice questions, select percentages that add up to 100% for the correct answers, and negative percentages for the wrong answers (selecting None would allow students to select wrong answers without penalty!).
- Finally, click on Save changes.
Add as many questions as you like.
Additional settings in the question bank:
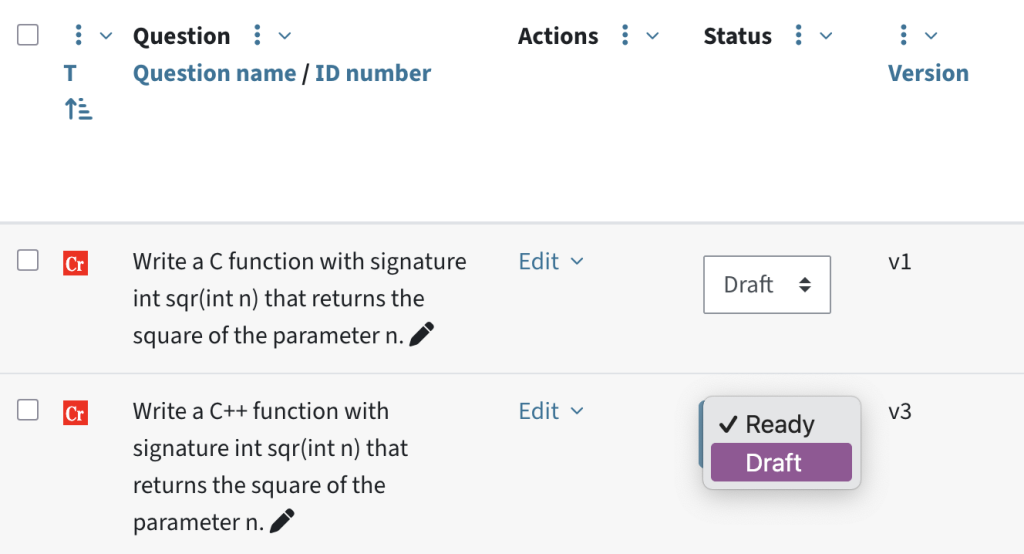
You can mark questions as Draft or Ready.
Questions have versions. Each edit creates a new version. This can be helpful to have an overview of changes. By default, a test always uses the latest version; however, you can use a specific version of the question as well. To see all the versions of a question, click on Edit > History.
In the last step, you now need to include the questions you have created in the question bank in the empty quiz you have created before.
Adding questions from the question bank to a quiz
- Open the empty quiz you have created before.
- Click on the Questions tab or on the Add question button.
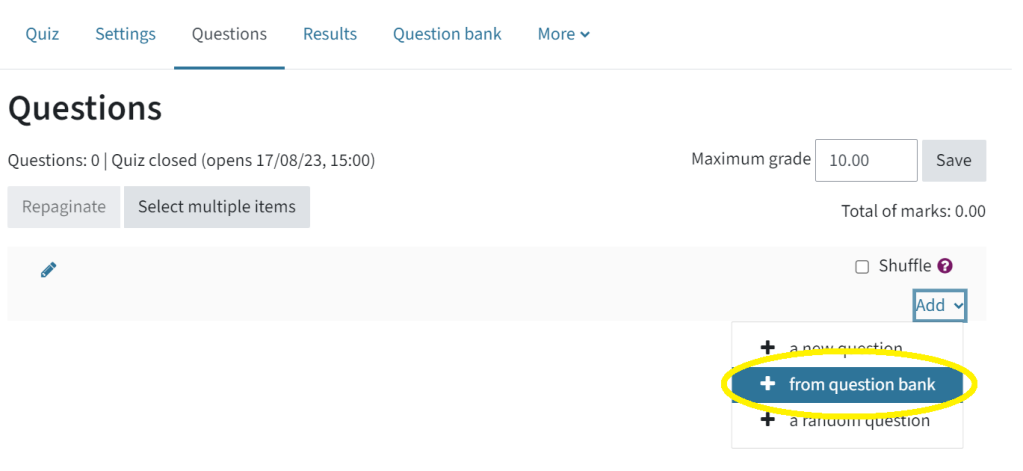
- Click Add at the lower right and select + from question bank.
- Select the questions. You can also filter for categories.
- Finally, click on Add selected questions to the quiz.
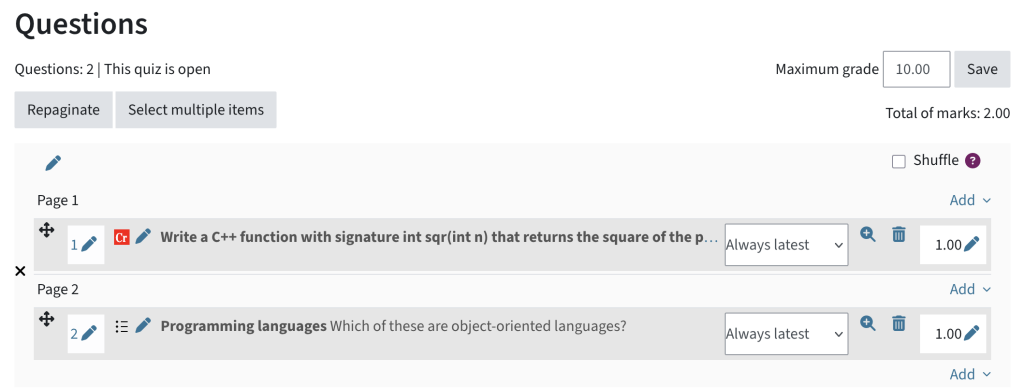
In this overview, you can also add sections, arrange the questions differently, change the numbers of the questions and quickly edit the total points. See also settings for grading a test.
Previewing the quiz
- Open the quiz
- Click on Preview quiz. As a teacher, you can only preview the exam and your grades are not saved. The preview can be repeated as often as you like.
You can also change your role by clicking on your name on the top right > Switch role to… > Student. Then you will see the exam from a student’s point of view.
Giving certain students more time for the exam
Students with a disability or illness are entitled to an extended exam time depending on their situation. In the TeachCenter, you can simply overwrite the end of a quiz for individual students.
- Open the quiz.
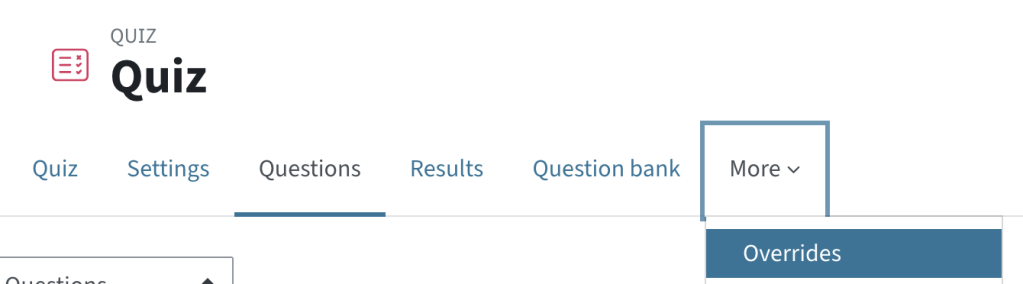
- Go to More > Overrides.
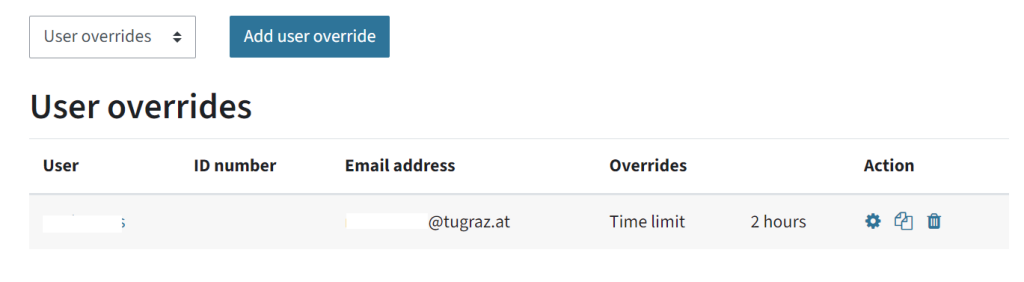
- Add User Override.
- Search for the name of the student who should get an extended test time.
- Change the quiz closure and/or time limit accordingly. Note: the quiz closure is the latest submission time and the exam will be submitted at this point, even if the students would have more time according to the „time limit“.
- Click on Save.
In the following overview, you can still edit (gear icon) or delete (recycle bin) the user override.
Grading a quiz and exporting results
Before the quiz: Settings for grading
Maximum points and points for individual questions
In the Questions tab, you can set the points for the individual questions (except random questions, which always have one point). The sum is shown as Total of marks.
Independently of the sum, you can define a Maximum grade (= actual maximum points for this quiz), which may be different from the sum and will be scaled accordingly.
Grade items: Points for groups of questions
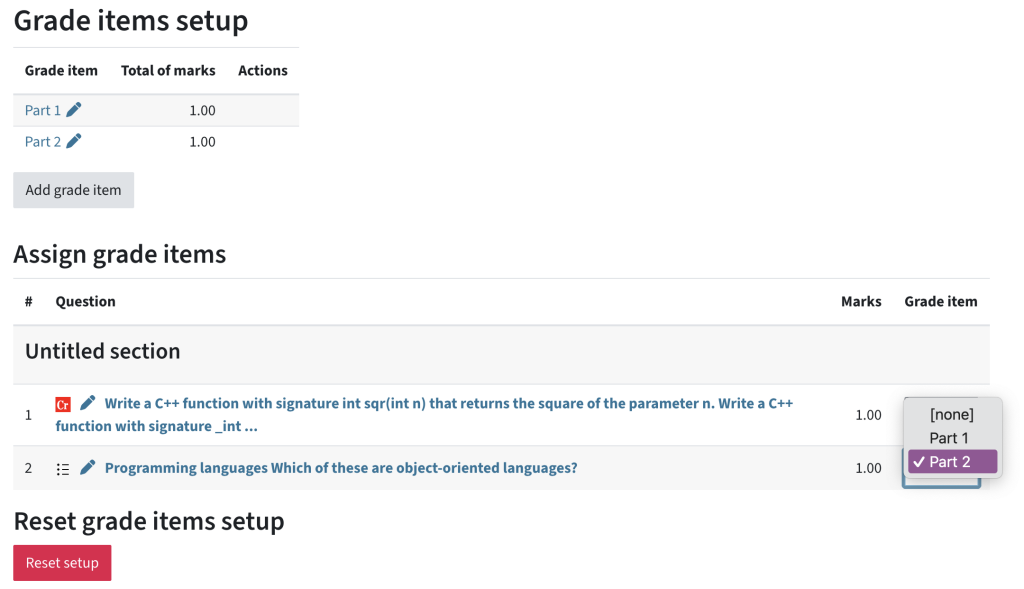
It is possible to create grade items for parts of a quiz. This allows questions to be grouped together and students can then see both their total points and the grade of the individual areas.
- Select Set up grade items from the drop-down menu in the Questions tab.
- Add grade item to create the groups and assign a name that students will see later in the results.
- Assign the questions to the items.
Grade to pass
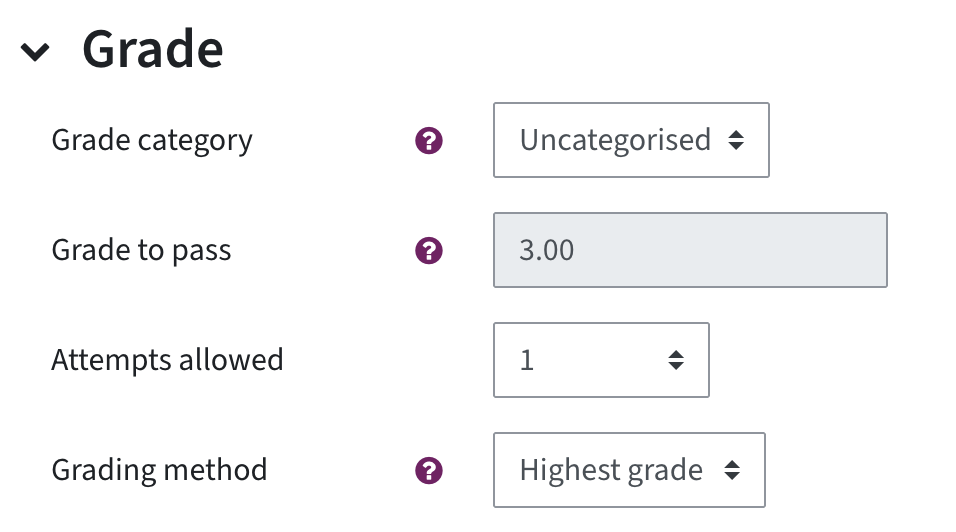
In the Settings tab, you can define a Grade to pass. Please note: This only influences how the results are presented, or it can be used for conditions (see Restrictions). It does not mean that students will receive a failing grade (5).
After the quiz: Grading
Most of the question types in a quiz are graded automatically. You can view and check the results in the Results tab.

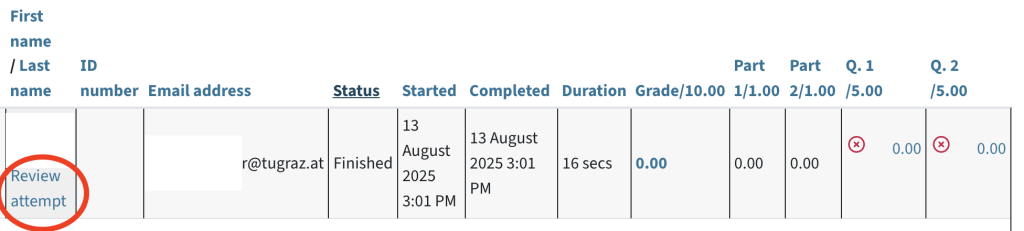
You will see a table of your students and their points. If you are using grade items for grouping your questions, you will see not only the points for the individual questions, but also the points for the chosen groups.
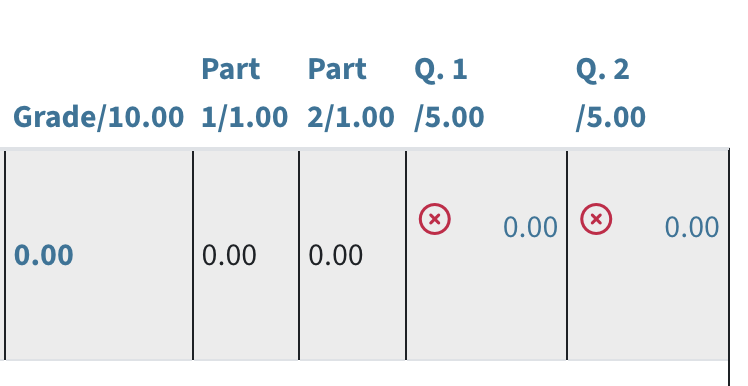
Click review attempt below a person’s name to view their test attempt. You can also edit the points and leave comments there (e.g. for additional feedback or corrections).
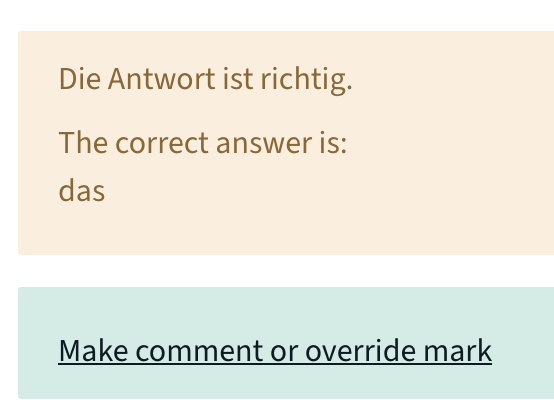
Click Make comment or override mark to leave a comment or change the grade. Save your changes.
Essay-type questions must be graded manually. It is cumbersome to click on review for each person, so there is an option to manually grade all the answers to one question at the same time. In the Results tab, choose manual grading from the dropdown menu.
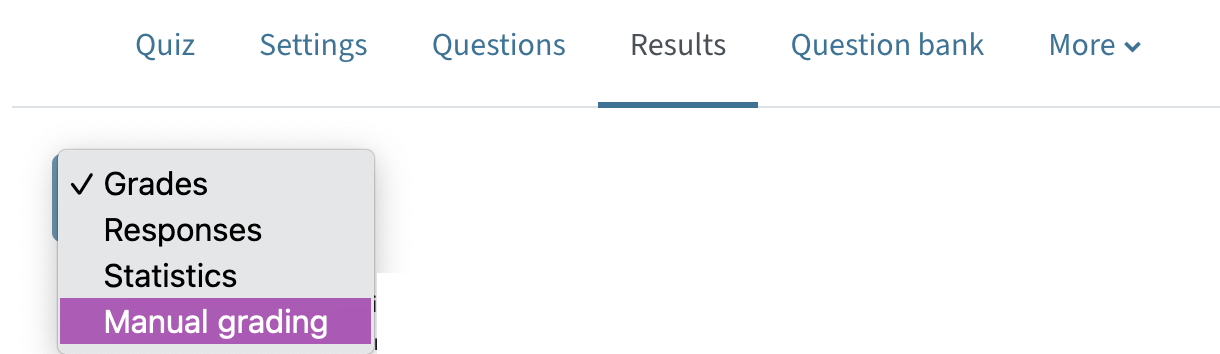
You will now see an overview of the questions that still need grading.
Click Grade all to see a list of all the answers to the respective question. Points and comments can be edited as described above. Do not forget to save changes.
After the quiz: Exporting results
In a quiz, you can create reports and download the detailed results as a table (questions, answers, correct answers, points). If you want to export the grades to TUGRAZonline, see the guide on Grading.
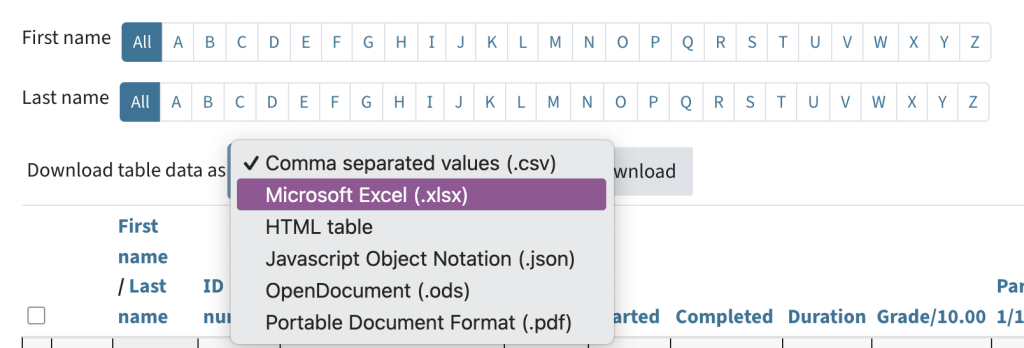
For a simple download of the points, go to the Results tab. Above the table listing the students and their points, there is an option to download the table. Choose the format you need and download.
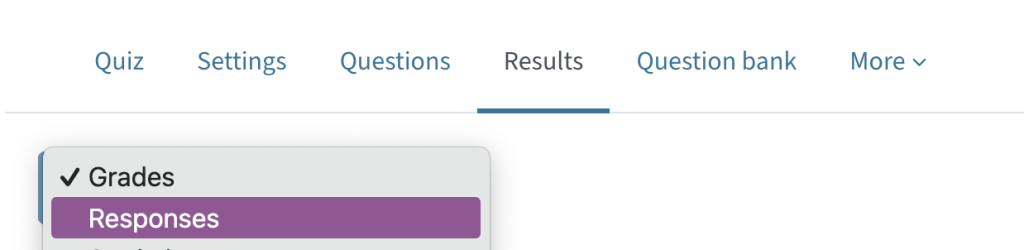
If you would like to download a more detailed report including the question texts, the students‘ answers or the correct answers, choose Responses in the dropdown in the Results tab.
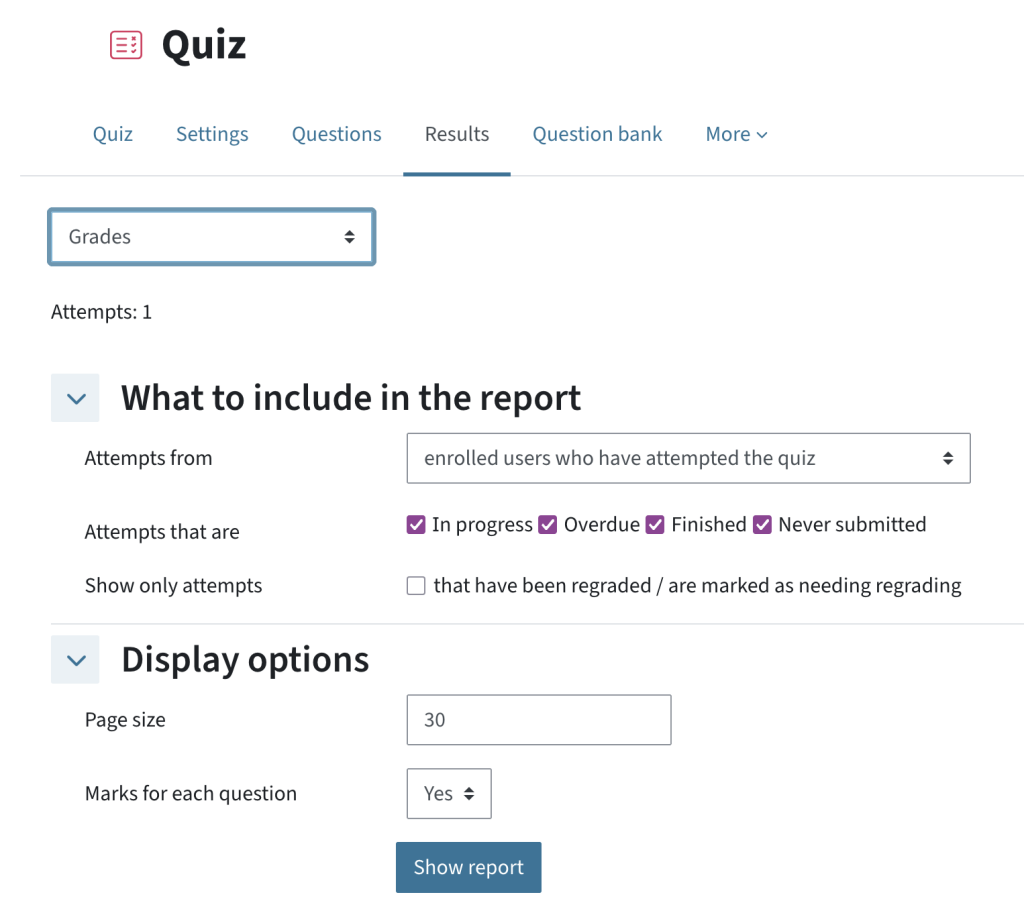
In Display options and What to include in the report, you can refine what is shown in the table and downloaded.
How students can see their scores
Students have two options for viewing their points:
- Via Grades in the course main menu, students can see their total points (or grade, if this has been enabled by teachers in the Grader report settings). Note: Students can only see their own grades!
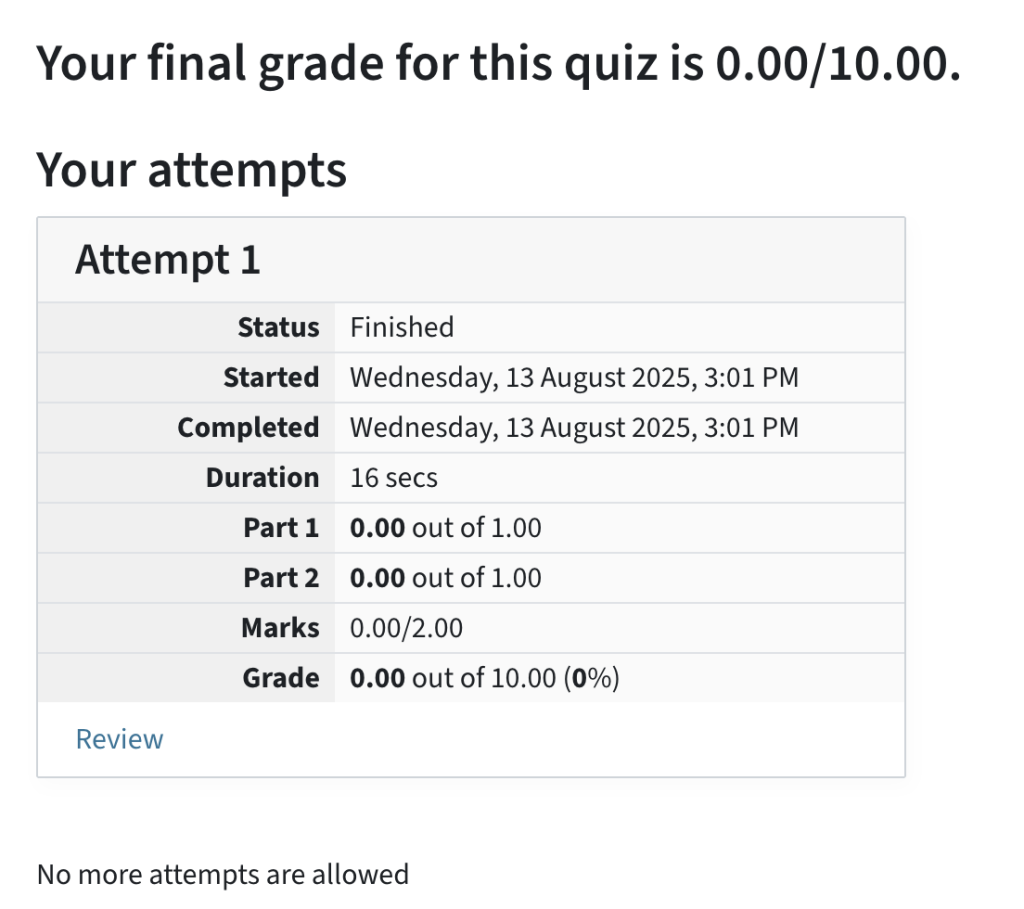
- Directly in the quiz activity, students see their total points, the points for grade items/groups (if used) and, if applicable, further details such as their quiz attempt, their correct answers or feedback (if checked by teachers in the review options)
FAQ about question types
How do I create randomised questions?
Random questions are a good way to prevent cheating, as students all get different exams.
The easiest way is to work with random questions from the question bank. For this, see our guide on randomizing questions.
The question type Calculated (external site) allows you to create a series of numerical questions using variables {x}, {y}, etc. The number range can be predefined.
There is also a question type called Calculated multiple choice (external site) , which is a combination of calculated and multiple choice. Random values can also be used here.
The STACK question type can also use random variables from your predefined range in answers. This question type is suitable for more complex mathematical questions; see the instructions for STACK.
Tips for designing single-choice and multiple-choice questions
- Each question should have a clear reference to one of the learning goals.
- Each question should address only one clearly formulated problem and contain all the information necessary to answer it. No additional information that is irrelevant to the answer should be provided, unless the aim of the question is to filter this out.
- Each question should be formulated in simple and clear language and, as far as possible, should not contain any negations.
- Questions/subclauses are better than cloze texts (gap-fill).
Tips for formulating „distractors“ (wrong answers)
- All alternatives are plausible
- All alternatives are clearly and concisely formulated
- All alternatives are mutually exclusive (do not overlap)
- All alternatives are similar in form, length and language
- It should not be possible to deduce the correct answer from the wording, e.g. that all answer alternatives are grammatically correct in relation to the question.
- The correct answer should not be formulated ‚from the textbook‘ if possible.
- If possible, as many words as possible should be moved to the question if this makes the answers shorter and avoids repetition.
- Avoid ‚all of the above‘ and ’none of the above‘.
- Avoid absolute statements such as ‚always‘, „never“ and ‚completely‘.
- Arrange answers (e.g. alphabetically, numerically) so that no conclusions can be drawn about the correct answer(s) from the order.
Help & contact
If something does not work as described, get in touch – we will look into it.