Exams using KnowledgeCheckR
KnowledgeCheckR is suitable for the creation and execution of online exercises and online exams.
Information about KnowledgeCheckR and System Description
What is KnowledgeCheckR and how do I get access?
In the application mode, knowledge can be consumed in small units and consolidated by answering questions. The system gives feedback on the correctness of the answers and, in the case of incorrect answers, provides explanations. An optional graphical comparison between one’s own level of knowledge and that of a peer group (community) ensures that users are motivated to interact with the system on a regular basis.
Which contents / questions are displayed and in which form correct answers are shown and explained can be defined in detail in the administrator mode. In the administrator mode, knowledge units and tests or competitions can be created – at the same time, a user can get an idea of their own and the community’s level of knowledge by means of different visualisations. The degree of visibility of the knowledge status of individual users or of an entire group (e.g. staff/students) can be parameterised.
No installation is required to use KnowledgeCheckR – the system can be accessed from any browser, regardless of the operating system (Linux, Windows, MacOS, Android, iOS) or the end device (smartphone, tablet, desktop). This means that there are no initial costs for establishing the system.
KnowledgeCheckR is connected to the user administration of TU Graz via SSO (single sign-on). Students can access the system directly via the TeachCenter Exam with their TUGRAZonline credentials.
What is an app, what is a check?
An App contains a collection of questions for a course (= question bank). Within Apps, you can create a Check (= exam) containing random or certain questions from the App (question bank) for the respective exercise or exam.
Administrators (= teachers) can create Apps or Checks. N.B. when creating an App, you are the only administrator at first, but you can add other teachers manually. The TeachCenter team is added to each app so that we can provide support.
Administrators can also define a variety of other settings for each exam – e.g. the start and end time of the exam, maximum exam duration, additional identification fields (matriculation number, first name, last name, etc.), which must be filled in by the students at the start of an exam, as well as various settings for cheating prevention.
Grading is usually carried out fully automatically by the system and students are shown the result directly after the examination.
Various export options for the exam results enable easy transfer into existing systems (e.g. TC Exam).
Proctoring with KnowledgeCheckR
KnowledgeCheckR allows for fully automated proctoring, where each student is proctored individually. The desired level of proctoring has multiple levels, which allows for exams with large numbers of students.
All methods of proctoring are an integral part of KnowledgeCheckR, keeping all data within the application (no data transfer to external services). Internet failures of candidates are automatically bypassed by intelligent data transfer and do not lead to exam interruptions (as soon as a candidate is able to view the exam, it can be taken until the end of the exam even if the connection is completely lost).
Proctoring – General
If required (and if requested by the course leaders), the system will record whether students have changed the browser window or started another programme during the examination. If active, the student will see a notification during the exam.
Proctoring – image analysis
During the exam, photos of the candidates are taken at random intervals (if requested by the lecturer). The photographs can ensure that the examination is fair.
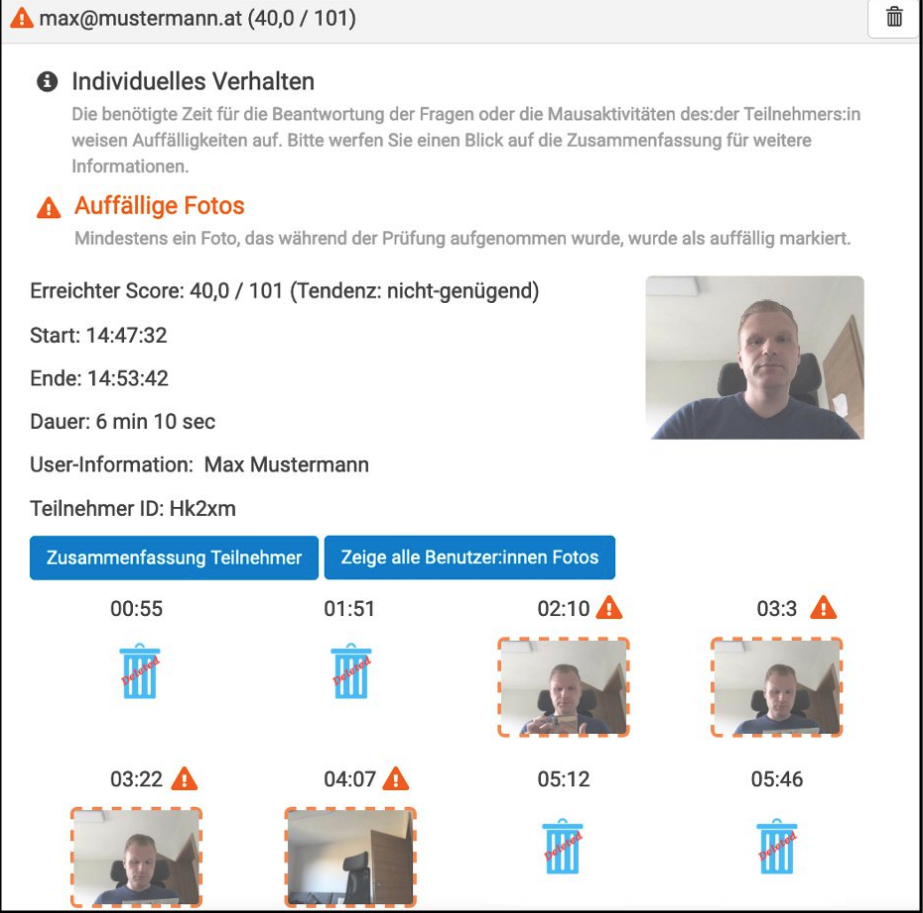
Photographs taken during exams will be presented to the course leaders for manual review. If the examiners identify conspicuous behaviour, the photos can be marked as „conspicuous“ and become part of the examination file. All photos not marked as conspicuous are automatically deleted 3 working days after the examination. Photos marked as conspicuous remain stored as part of the examination file for 6 months for possible examination inspections or plausibility checks.
Due to an intelligent compression system, the photo transmission does not require a high internet bandwidth from participants.
Proctoring – Individual behaviour
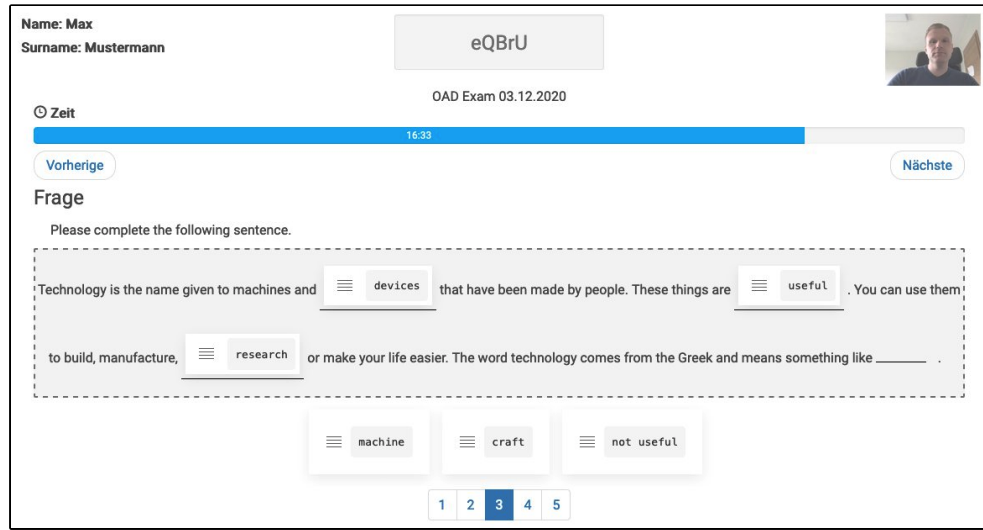
In addition, the time required per question is recorded (if requested by the examination invigilators). With the help of this information, students‘ „problem areas“ can be addressed in a targeted manner (where the most examination time was invested, which questions were unclear, etc.), and this information also provides valuable feedback to the lecturer on the complexity of the questions asked or the examination as a whole.
In addition, the students‘ mouse activities can be recorded – mouse activities during an examination provide valuable information about the complexity of questions or whether information was obtained from other sources during the examination. If active, the information is displayed in the examination record of the respective student.
Display of „conspicuous photos“ for course leaders
Students whose behaviour has been marked as conspicuous (at least one examination photo has been marked as conspicuous by the course instructor) are marked in the list of students. Course leaders can keep an overview and can determine the further procedure (possibly invitation to a „post-exam review“ / plausibility check).
What is the difference between KnowledgeCheckR and TeachCenter Exam?
Exams in KnowledgeCheckR are not intended to replace the testing activity in TeachCenter-Exam, but merely provide an additional way to create and conduct an online exam. With this system, teachers are offered another alternative to offer online exams.
The biggest difference between KnowledgeCheckR and the testing activity in TeachCenter-Exam is the cheating prevention through photos taken randomly during the exam that need to be manually checked by teachers. Also, the KnowledgeCheckR can bridge gaps in the connection of students and students can still submit if they lose the connection during the exam.
Proctoring – General
In addition, some new question types are offered in KnowledgeCheckR, such as multiple choice with pictures. Mathematical entries can be entered in KnowledgeCheckR in LaTeX format, similar to STACK questions in TeachCenter Exam.
Proctoring – image analysis
The TeachCenter Exam, on the other hand, offers a greater variety of different question types and the advantage of a familiar environment for both students and teachers.
The photos taken during exams are presented to the course leaders for manual review. If the course leaders identify suspicious behaviour, the photos concerned can be marked as „conspicuous“ and thus become part of the examination record. All photos not marked as conspicuous are automatically deleted 3 working days after the exam. Photos marked as conspicuous remain stored as part of the examination record for 6 months for possible post-exam reviews or plausibility checks.
Thanks to an intelligent reduction of the image data, the exam does not require a high internet bandwidth from participants.
Proctoring – Individual behaviour
If required (and if the course instructors wish), the time needed per question is also recorded. This information can then be used during any exam reviews to address students’ “problem areas” specifically (where most of the exam time was spent, which questions were unclear, etc.); it also gives course instructors valuable feedback on the complexity of the questions asked and of the exam as a whole.
In addition, the students' mouse activity can be recorded – mouse activity during an exam provides valuable clues as to how understandable the questions are and whether information was obtained from other sources during the exam. If this is enabled, the information is shown in the exam record of the respective student.
Display of marked „irregularities“ for course leaders
Participants whose behaviour has been marked as conspicuous (at least one examination photo has been marked as conspicuous by the course instructors) are given an exclamation mark in the list of participants. This gives course instructors an overview and allows them to decide individually how to proceed (possibly inviting the student to a “submission interview” / plausibility check).
Creating CheckR exams
Creating an app and adding questions
Log in to KnowledgeCheckR (external site) via SSO with your username and password or enter KnowledgeCheckR via TeachCenter Exam. Click on + CheckR App on the homepage
Give the app a title (e.g. course name and number) and optionally, add a description.
You can add co-creators who are also allowed to edit the app.
The TeachCenter support team is also added automatically so that we can access the app if problems occur.
How do I add questions to the App?
To create a collection of questions, you can at first set as many categories as you want. By default, there is only one category called „General“.
- Below this, click on 1. Question text, to create the first question.
- Select the category, which the question belongs to.
- Optionally, you can specify how important this question is.
- Next to the scale icon you can enter the achievable points .
- Then add the Question text and optionally an explanation, which is displayed if the question is not answered correctly.
- By clicking on the C+ on the right, you can also upload a picture to the question.
- Select one of the five question types: Single/Multiple Choice Selecting areas/image interactions of a matrix Fill-in-the-blank Sorting Free-text answer.
Below, click 1. Question Description to create the first question.
- Select the category which the question belongs to
- Optionally, you can specify how important this question is.
- Next to the scale icon you can enter the achievable points.
- Then add the question description text and optionally an explanation that will be displayed if the question is not answered correctly.
- By clicking on the C+ on the right, you can also upload a picture to the question.
- Select one of the five question types: single/multiple choice, select areas/ image interactions of a matrix, cloze, sort, or free text response.
Depending on the selected question type, enter the answer options or upload an image and define the correct solution(s). Use the slider to define how many correct answers are required for the question to be considered correct. This is especially intended for the practice mode to motivate students in the best possible way.
In the examination scenario, a question is only evaluated as correct during the automatic check of the questions, if all answers marked as correct were chosen correctly and none of the incorrect answers were chosen. Subsequently, an individual examination evaluation can be carried out on the basis of a generated excel file. The generated excel file shows which of the correct and which of the incorrect answer options were selected for each question.
When you have created a question, click the save button at the bottom right.
Return to the overview and create as many additional questions as you wish.
At the end, click Create CheckR App.
Creating an exam in KnowledgeCheckR
Log in to KnowledgeCheckR (external site) with your personal user data (email address and password).
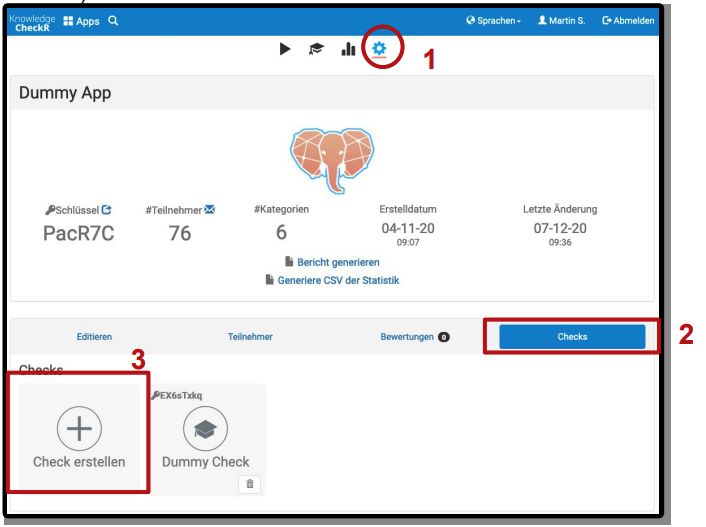
Switch to the administration of the course (CheckR App) for which you want to create a check.
Click on the tab „Checks“ and then on „Create check“.
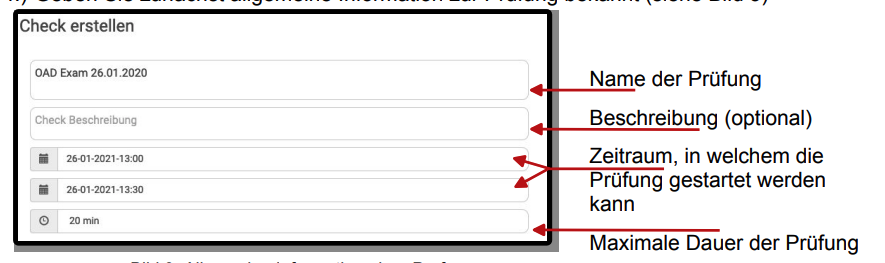
First enter general information about the check:
- Name of the check
- Description (optional)
- Time period in which the check can be started
- Maximum duration of the exam
In the first step, select the categories from which questions are to be asked in the exam. If there is a tick in front of the category name, all questions of this category will be included in the question pool of the exam. If necessary, individual questions of a category can also be included or excluded. Within a category, the selected questions can also be randomised.
Define advanced settings:
In the first step, select the categories from which questions are to be asked in the exam. If there is a checkmark in front of the category name, all questions in this category are added to the question pool of the exam. If required, individual questions in a category can also be included or excluded.
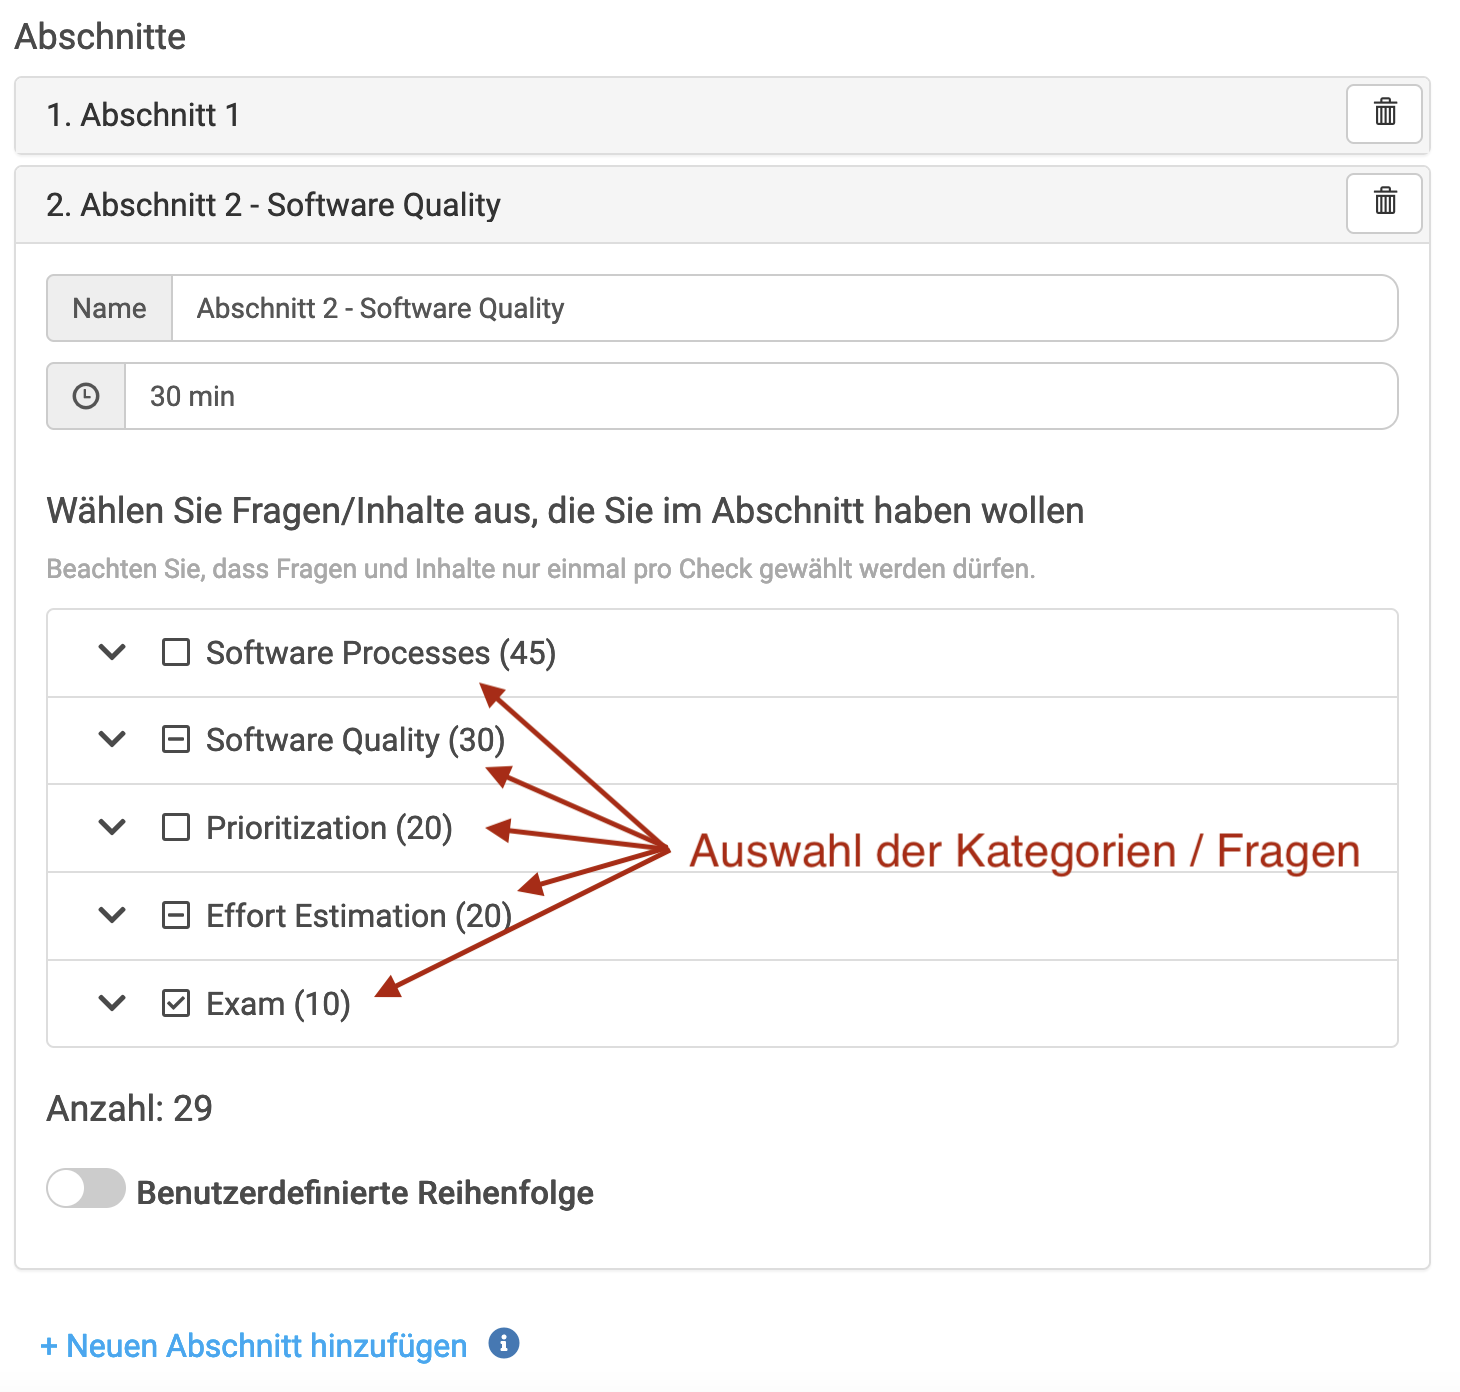
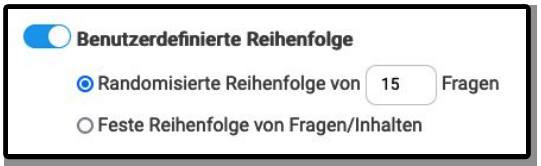
Within a section, the selected questions can also be asked in random order by activating „Custom order“.
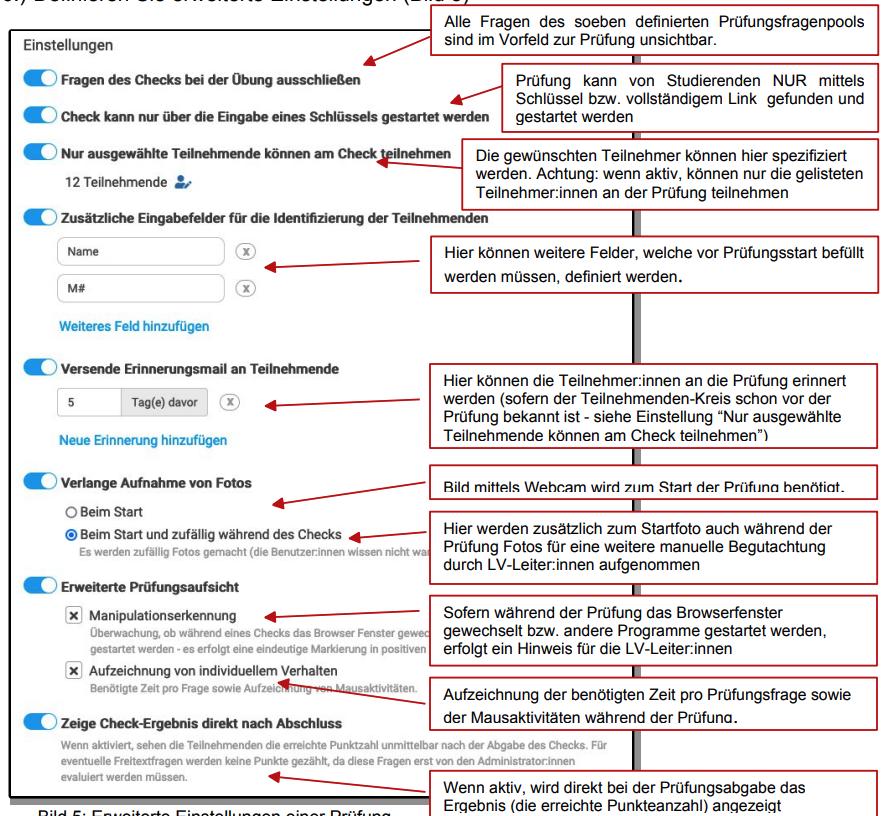
Define advanced settings:
- Exclude questions of the check in the exercise: All questions of the exam question pool just defined are invisible in the run-up to the exam.
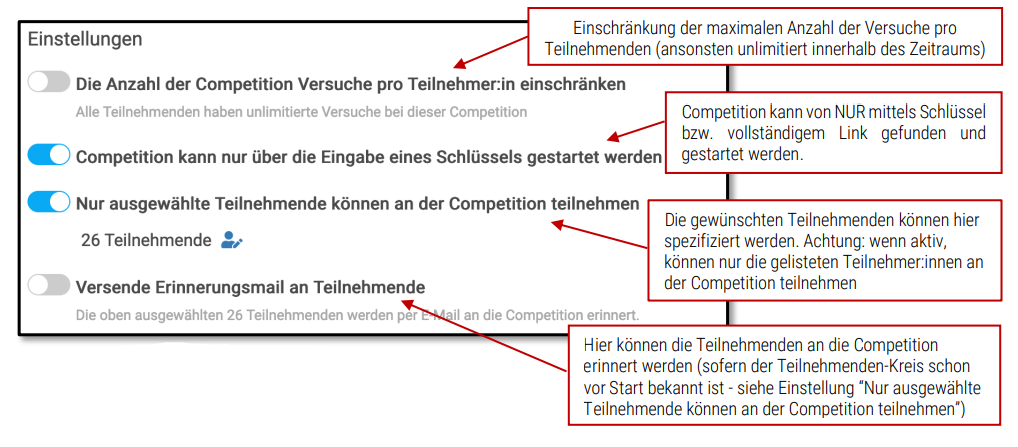
- Check can only be started by entering a key: Check can ONLY be found and started by students via key or complete link.
- Only selected participants can take part in the check: The desired participants can be specified here. Attention: if active, only the listed participants can take part in the exam.
- Send reminder e-mail to participants: Here the participants can be reminded of the examination (if the group of participants is already known before the examination).
- Additional input fields for the identification of participants: Additional fields can be defined here, which must be filled in before the examination starts.
- Request for photos to be taken: A webcam image is requested at the start of the examination. At the start and randomly during the check: Here, in addition to the start photo, photos are also taken during the check for further manual assessment by the course leader.
- Show check result directly after completion: If active, the result (the number of points achieved) is displayed directly after the examination.
- Extended examination supervision: Recording of the time required per examination question as well as the mouse activities during the examination. If the browser window is changed or other programmes are started during the examination, a message is displayed to the course leaders.
As soon as you have made all the desired settings, press „Save“ at the bottom right of the window to create the exam.
A summary of the exam you have just defined will be displayed – if you do not want to make any more changes, click on „create“.
In order to have the Check (exam) linked to the TeachCenter exam, please contact the TeachCenter support and send us the link to your Check.
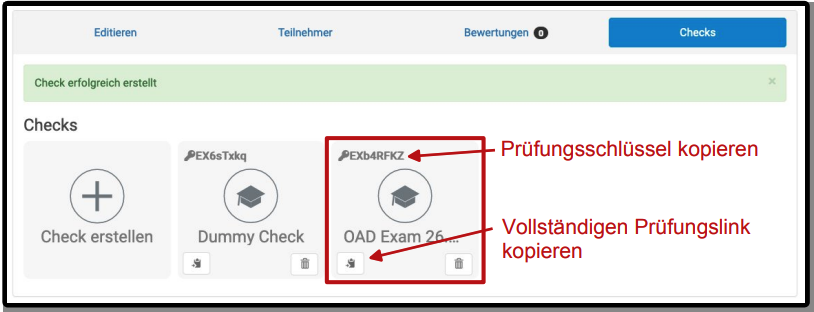
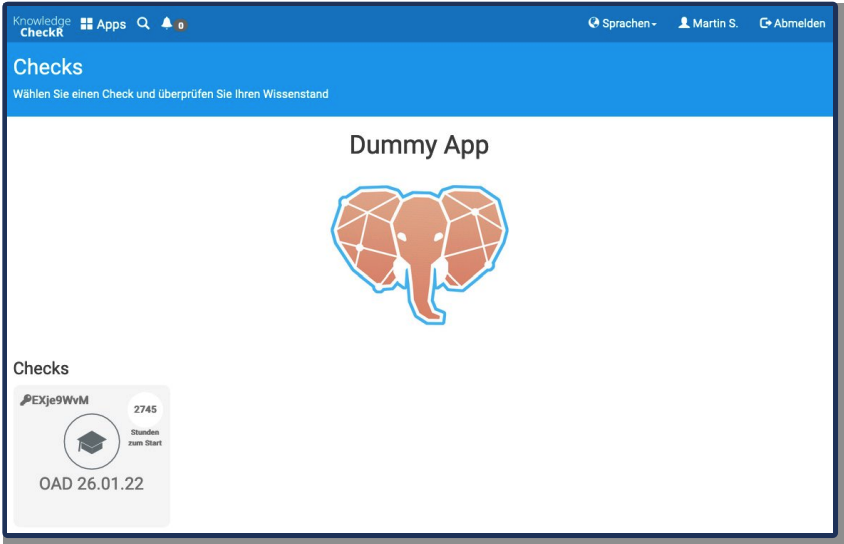
After the exam (check) has been created, it will appear in the list of exams for this course (App). Students can then access the exam via the link in the TeachCenter Exam course.
Students can then access the exam via the link in the TeachCenter Exam course.
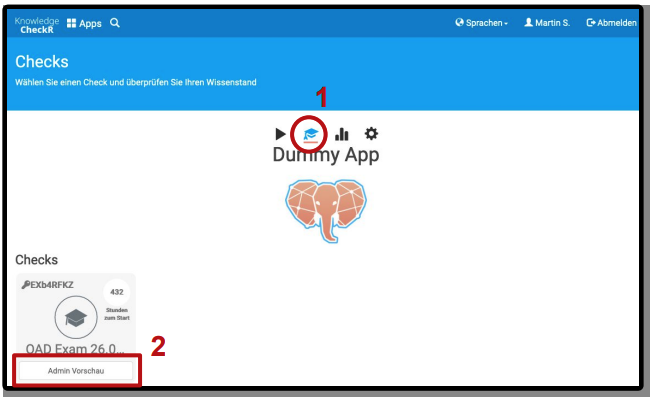
Preview of an exam
Teachers have the option to preview an exam – here, both the selected settings of the exam and the entire exam can be viewed from the student’s perspective without having to give answers to the questions – the correct answers to the questions are automatically displayed. The exam preview can be started for all available exams regardless of the defined time period in which the exam can be started by students.
Creating a competition in KnowledgeCheckR
Competitions can be used for exam preparation on the one hand, and for practice on the other. They can also be configured as you want, e.g. „Sudden Death“-competition, „Time Rush“-competition. If desired, the best 3 users of each competition can be displayed to the other students and possibly earn some extra points for the exam or exercise. If you want to create a competition, first log in to KnowledgeCheckR. (external site)
- Go to the administration of the course (CheckR App) for which you want to create a competition.
- Click on the „Competitions“ tab and then on „Create competition“.
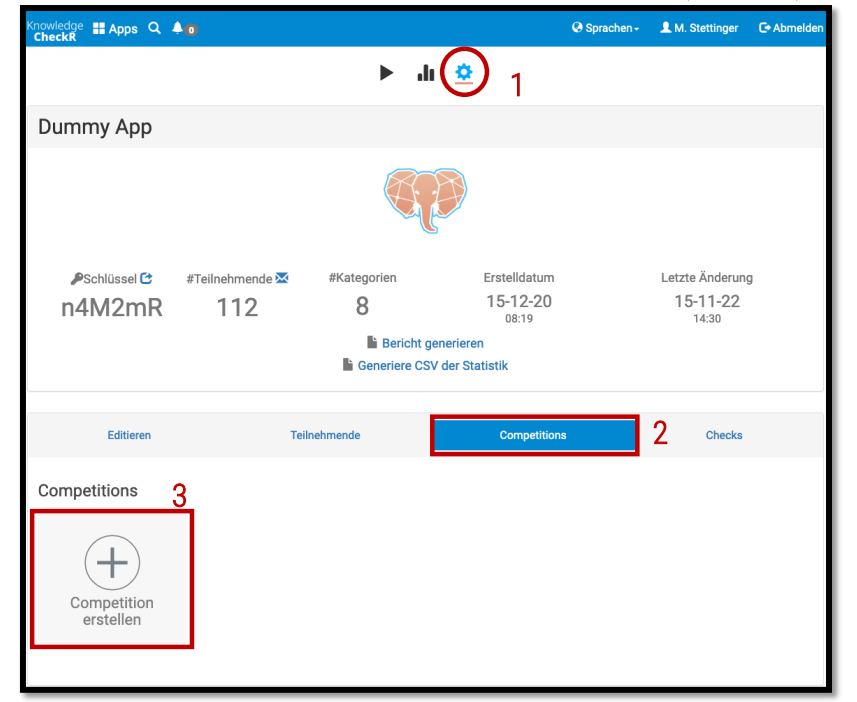
- First, select the game mode for the competition.
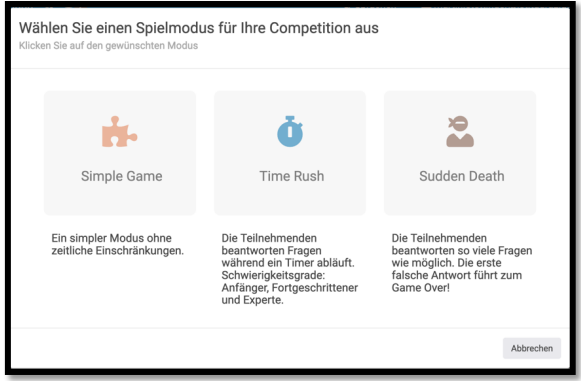
- You can choose between the following 3 different game modes:• Simple Game: The simplest game mode. Questions released for the competition are put to the participants. The top three participants appear on the competition leaderboard. • Time Rush: Participants answer the questions of their choice while a timer counts down. You can choose between 3 difficulty levels (beginners, advanced and experts). • Sudden Death: Participants answer as many questions as possible. The first incorrect answer means game over.
- First, provide general information about the competition.
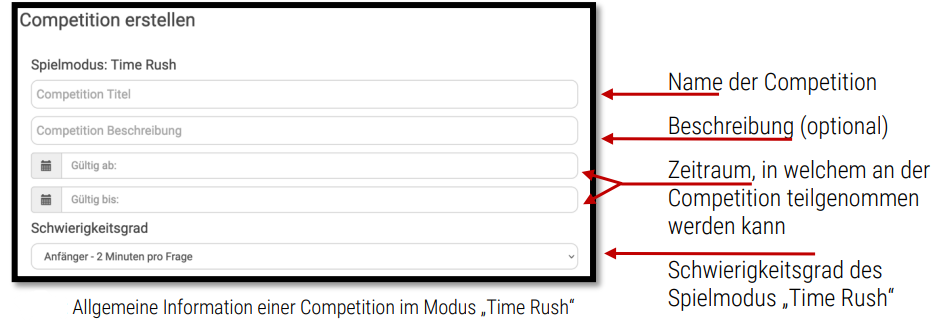
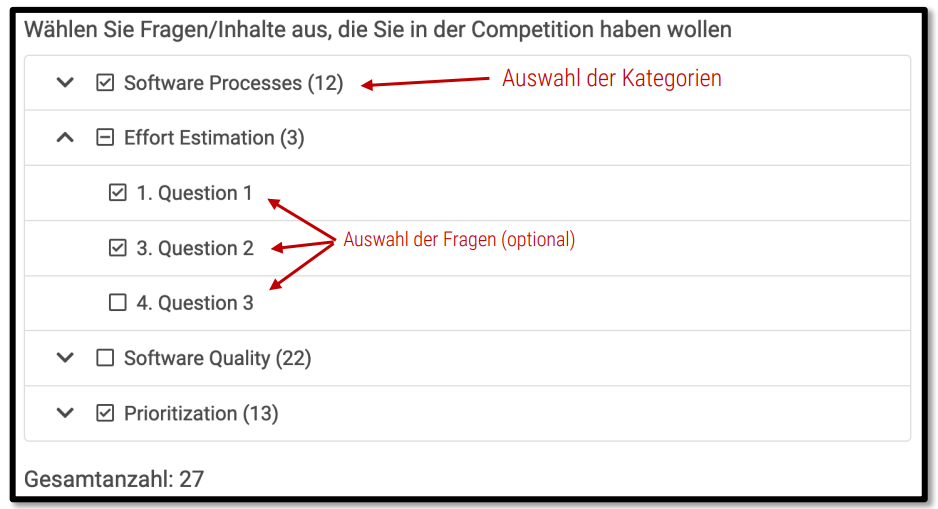
- Then define a question pool to be used in the competition.
You can choose between the following 3 different game modes:
- Simple Game: This is the simplest game mode. Students are asked questions that have been released for the competition. The best 3 students will appear on the competition’s leader board. Time Rush: Students answer questions with a timer running. There are 3 levels of difficulty to choose from (beginner, advanced and expert). Sudden Death: Students answer as many questions as possible. The first wrong answer means game over.
- Definieren Sie eine Reihenfolge der Fragen der Competition.
- Secondly, give general information about the competition.
- Then define a pool of questions that should appear in the competition.
In a first step, select the categories from which questions should be asked in the competition. If there is a check mark in front of the category, all questions of this category will be added to the question pool of the competition. Individual questions of a category can also be included or excluded if necessary.
- Define the order of the questions in the competition.
- Es wird Ihnen eine Zusammenfassung der soeben definierten Competition angezeigt. Sofern Sie keine Änderungen mehr vornehmen möchten, klicken Sie auf „erstellen“.
- Nachdem die Competition erstellt wurde, erscheint sie in der Liste der Competitions dieser Lehrveranstaltung (App).
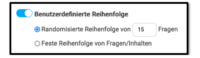
If you want a random selection of questions for each student, enter the desired number of questions. The questions are part of the previously defined question pool. Alternatively, you can define a fixed order of the competition questions.
Note: In this case, the order is the same for all students.
- Define advanced settings.
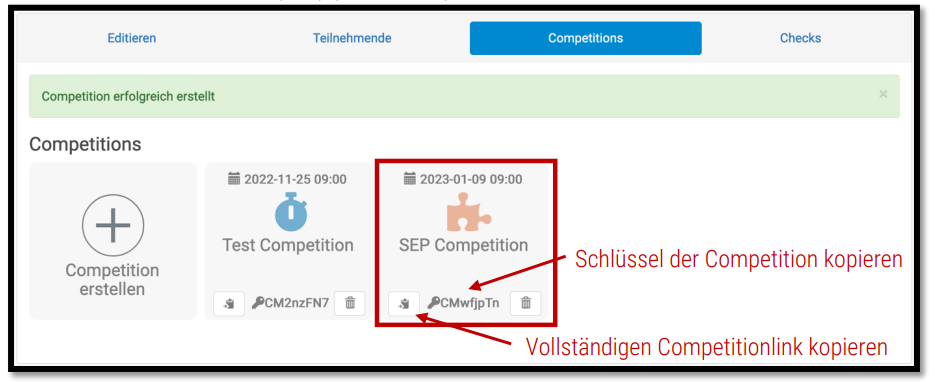
If you do not want to make any more changes, click on „create“.
- After the competition has been created, it will appear in the list of competitions for this course (app).
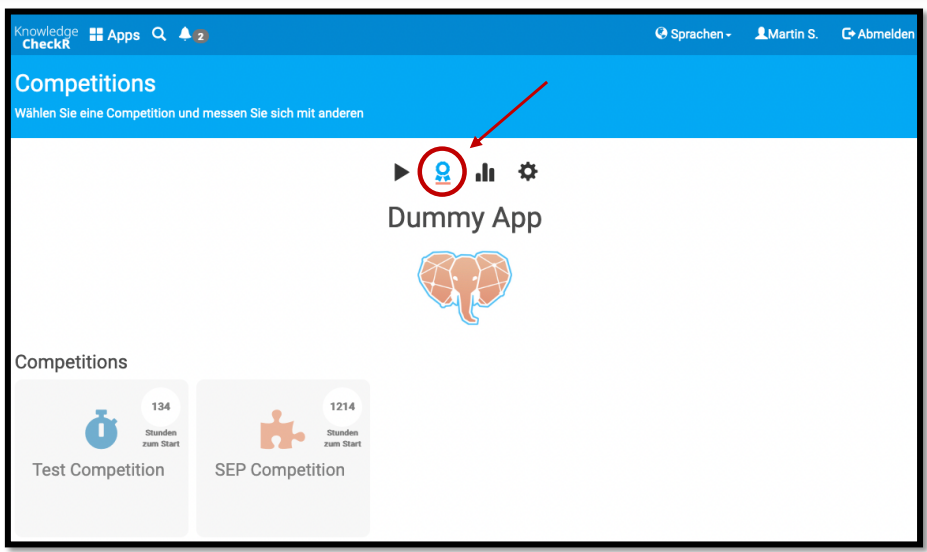
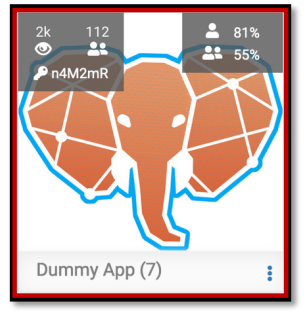
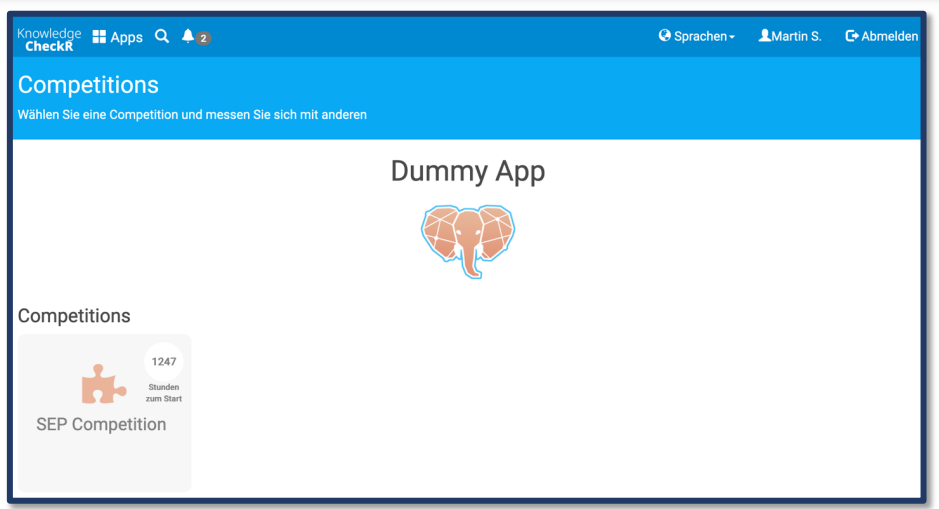
If no key has been created for the competition, students can access an overview of all competitions in the KnowledgeCheckR app by clicking on the competition icon.
Grading a Check
Most question types are scored automatically. Only free text answers must be corrected manually (The grading is done directly in the settings of the exam below the list of participants). With the help of a slider below the answer you can set the achieved points. To save the evaluation, click on the floppy disc and then on „Save Evaluations“.
It is also possible to generate an exam report as Excel or PDF with the detailed answers of the students. Within an exam you will find the item „Generate Exam Excel“ or „Generate Report“ for a PDF export.
N.B. That „Generate Report“ really only generates the report file. You need to click „Download Export“ to download the file.
KnowledgeCheckR for students
How do students find the KnowledgeCheckR exam?
KnowledgeCheckR can be accessed in any browser. Students can log into TeachCenter Exam (external site) as usual, access their course on the dashboard and find a link to the KnowledgeCheckR exam.
Where can students test the KnowlegeCheckR in advance?
A mock exam is not mandatory, but you can offer to your students to volunatrily familiarize themselves with the system in advance.
You can create a mock exam for this yourself (preferably with the same settings as for the real exam but with questions from categories that were excluded from the real exam).
Otherwise, there is also a dummy app with a practice test in it that can be used for such purposes. You can find this App via the TeachCenter-Exam course Test Your Exam (external site) .
What if students do not have a camera?
If the device on which students write the exam with KnowledgeCheckR does not have a camera, students can also configure their smartphone as a webcam.
The second option is to run the Check in KnowledgeCheckR without the camera cheating prevention.
Exchanging messages during an exam in KnowledgeCheckR (Exam Chat)
What is the Exam Chat?
Exam Chat is a chat function that is available during an exam as a direct means of communication between students and teachers. This allows the entire exam to be handled within KnowledgeCheckR, and there is no need for additional software such as WebEx, BigBlueButton, etc.
Activating the exam chat
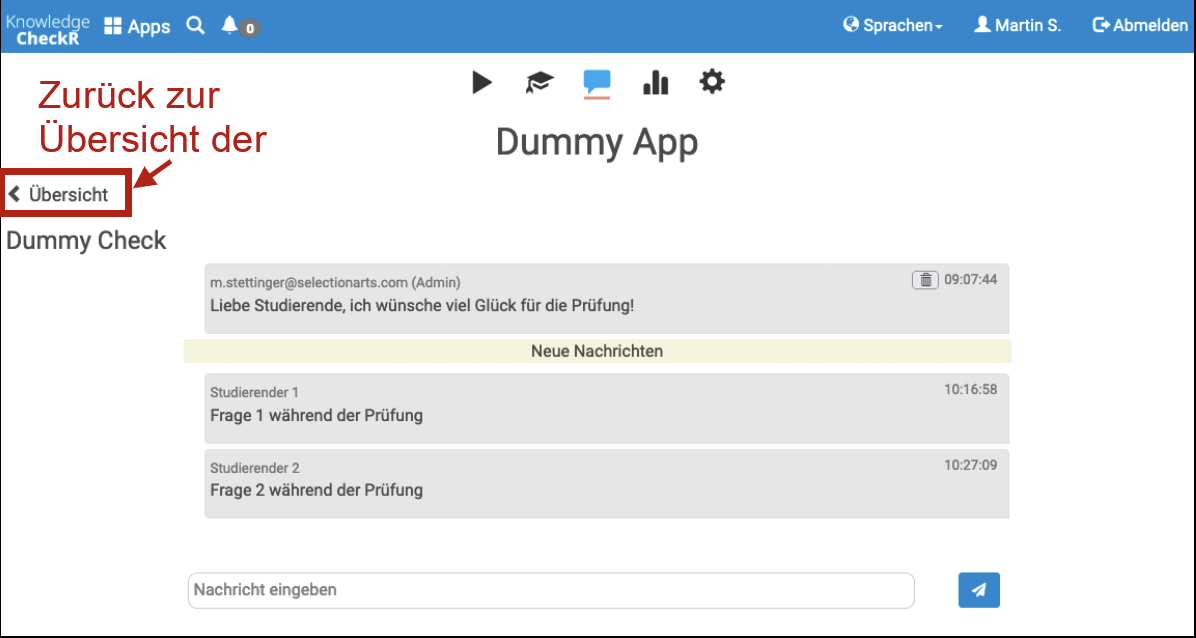
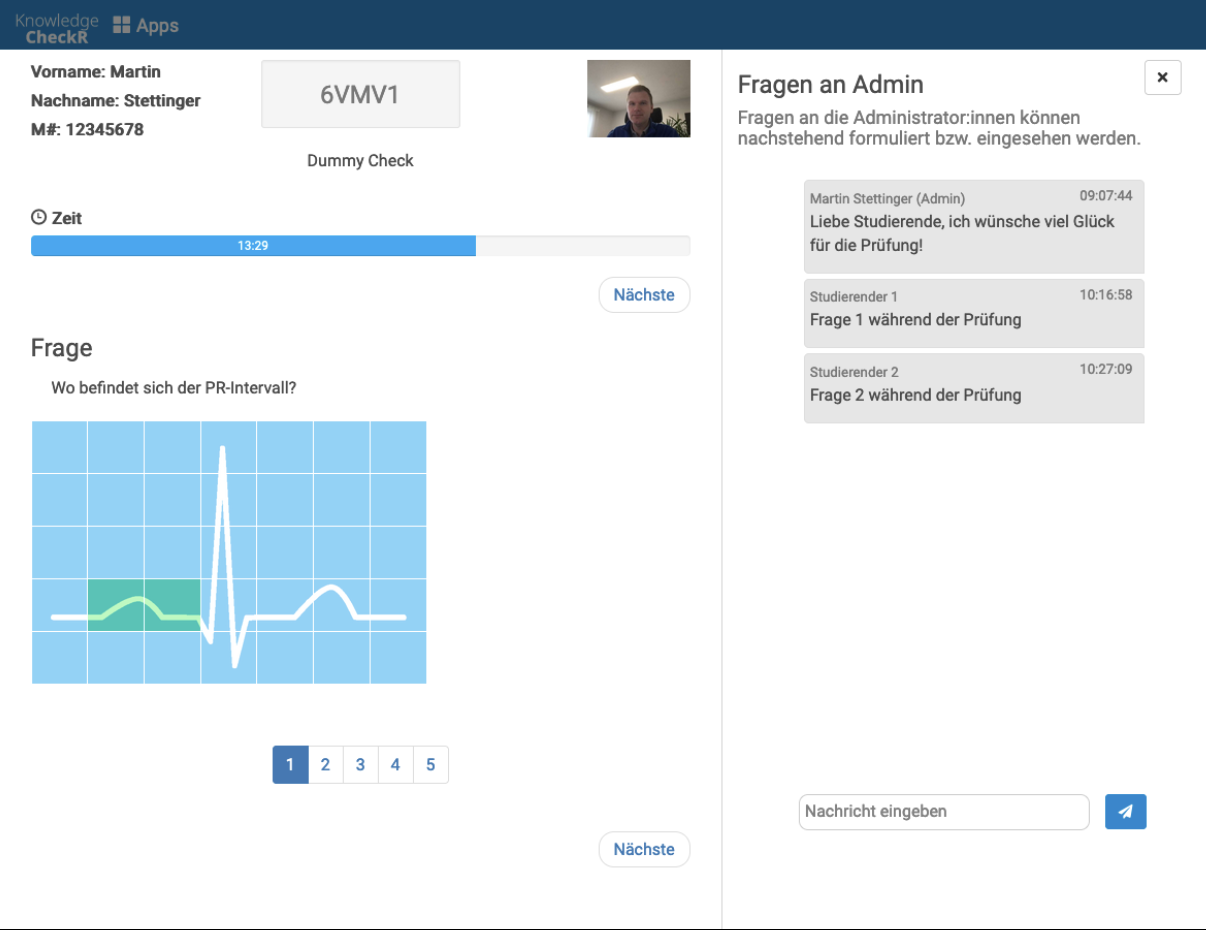
Teachers can activate the exam chat for any exam in the exam settings. Once activated, students can communicate with the teachers during the exam period. All students can see all messages as well as the teachers’ replies (similar to questions asked in the lecture hall). Teachers have access to all messages written during an exam for up to 6 months. 6 months after the respective exam, all messages are deleted automatically together with the exam records. Students have access to the messages during the exam period.
- Log in to KnowledgeCheckR (external site) with your personal user data (e-mail address and password).
- Switch to the administration of the course (CheckR app) for which you want to create an exam, or to an existing exam for which the chat function is to be activated.
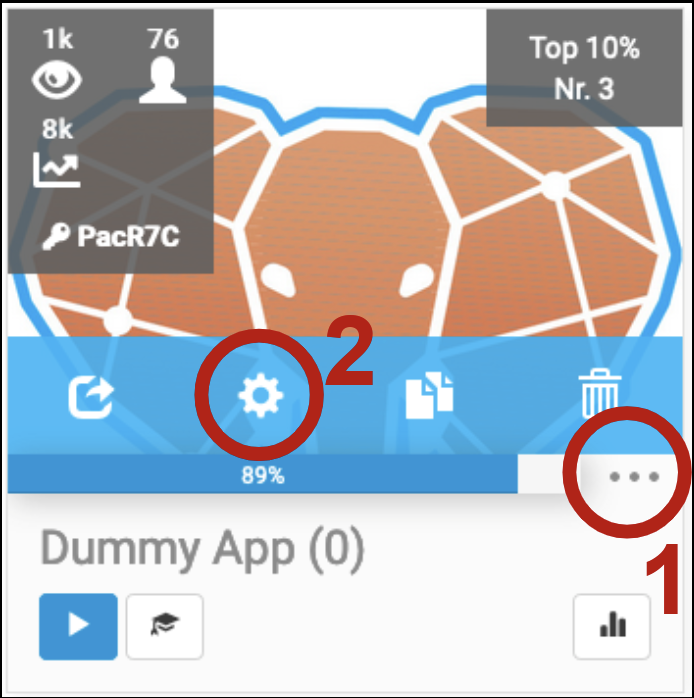
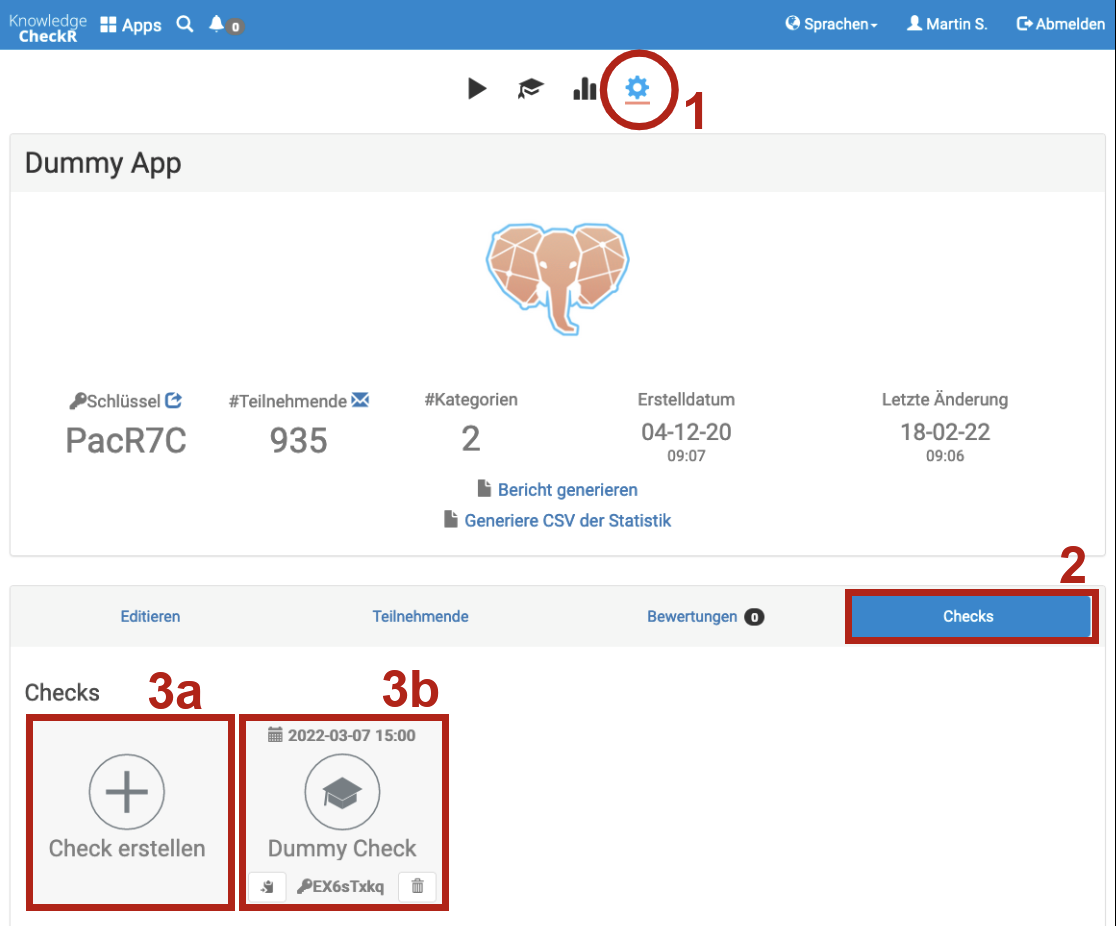
- Click on the “Checks” tab and then on “Create check” to create a new exam, or on the respective check for which the chat function is to be activated.
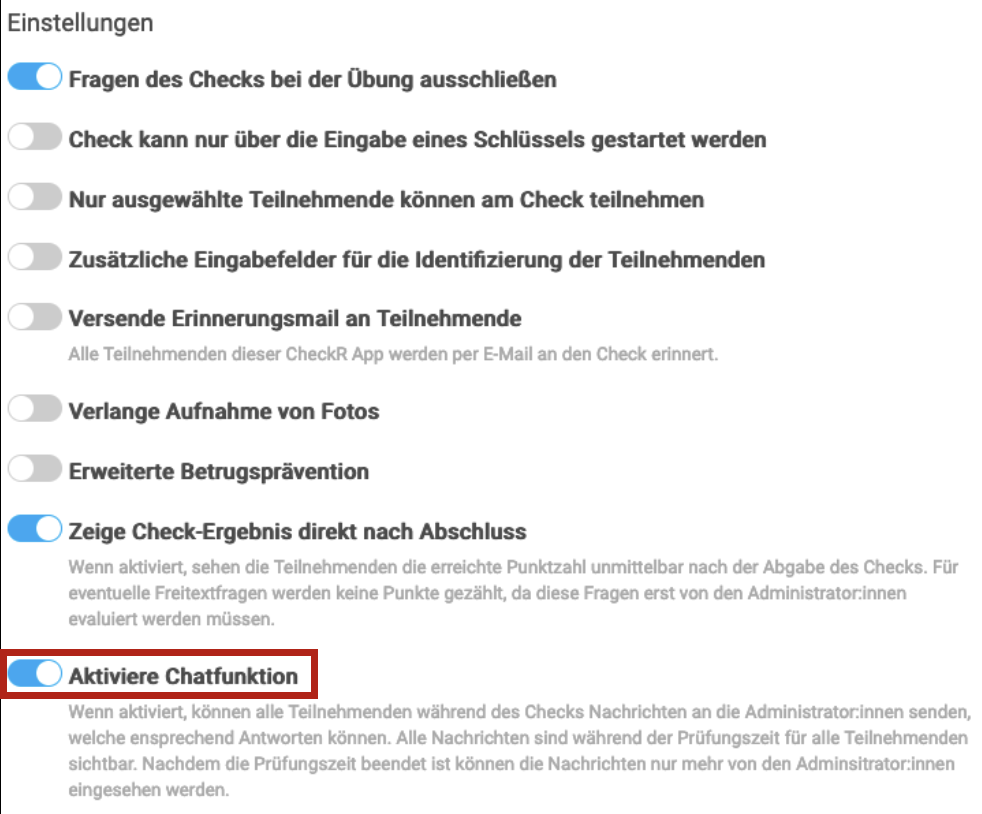
- Activate the chat function of the respective exam.
- Save the exam to apply the settings.
Access to the exam chat (for teachers)
The exam chat remains available to teachers regardless of the exam’s opening hours. 6 months after the exam, the exam chat is deleted automatically together with the exam records. Teachers are informed about this separately in advance.
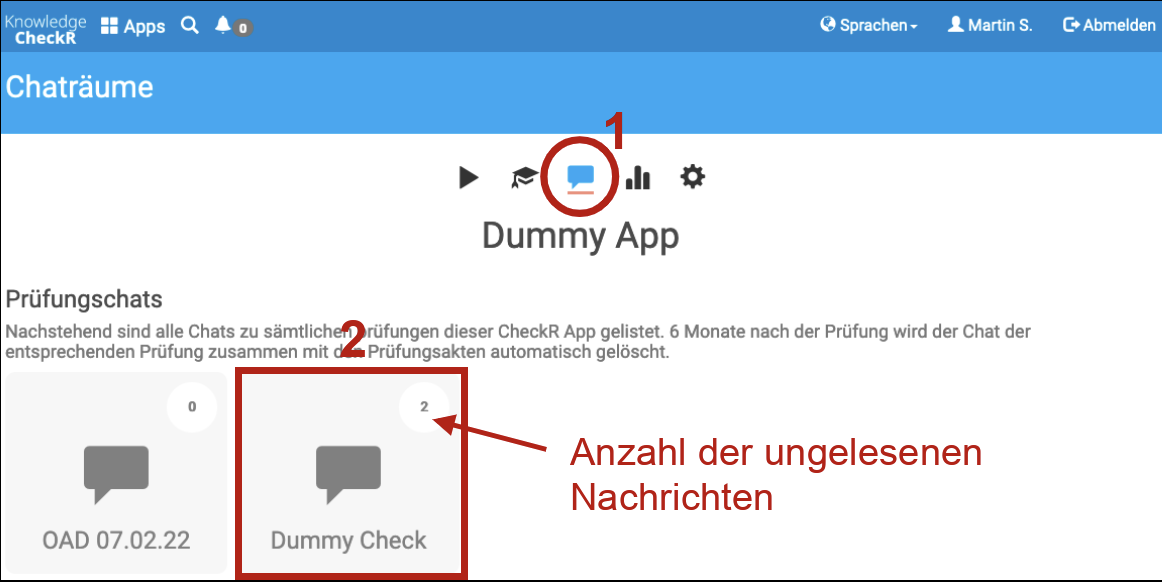
- Open the chat of the CheckR app in which the exam was created.
- Click on the respective check.
- Overview of all messages sent during the exam period
Access to the exam chat (for students)
The exam chat is directly available to all participants during the exam (provided the function has been enabled by the teachers).
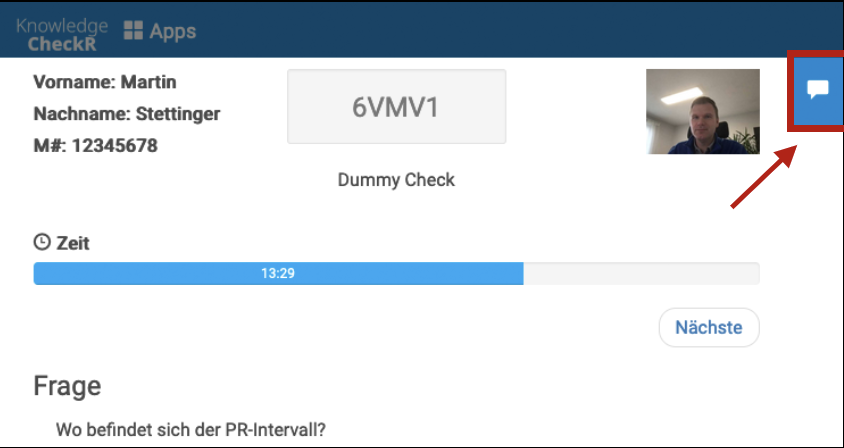
- During an exam, students can access the chat at any time.
- All messages remain visible to all participants for the entire duration of the exam – the messages are sorted by creation date.
Before and after the exam, the chat is not accessible to students. After 6 months, the exam submissions as well as all messages from the respective exam chat are deleted automatically.
Help & contact
If something does not work as described, get in touch – we will look into it.